How to troubleshoot car electrical problems? It’s a question every car owner faces at some point. From a dead battery leaving you stranded to flickering headlights ruining your night drive, electrical gremlins can be seriously annoying. This guide walks you through the basics of your car’s electrical system, helping you diagnose common issues, and even tackle some repairs yourself, saving you time and money at the mechanic.
Whether you’re a seasoned DIYer or a complete novice, we’ll break down the process step-by-step, so you can get back on the road quickly and confidently.
Understanding your car’s electrical system doesn’t require a PhD in engineering. We’ll cover essential components like the battery, alternator, and starter, explaining their functions and how to test them using simple tools. We’ll also show you how to safely diagnose problems with your lights, power windows, and other accessories. By the end of this guide, you’ll have the knowledge and confidence to handle many common electrical issues, keeping your car running smoothly.
Understanding Basic Car Electrical Systems
Your car’s electrical system is more than just headlights and the radio; it’s a complex network that keeps your vehicle running smoothly. Understanding the basics can save you time, money, and frustration when troubleshooting problems. This section will break down the key components and their interactions.
The Battery’s Role
The battery is the heart of your car’s electrical system, acting as a reservoir of direct current (DC) electricity. It provides the initial power needed to start the engine and runs all the electrical accessories when the engine is off or not generating sufficient power. A typical car battery is a 12-volt lead-acid battery, storing energy chemically and releasing it as an electrical current when needed.
The battery’s state of charge is crucial; a low charge will prevent the engine from starting.
The Alternator: Battery Recharging, How to troubleshoot car electrical problems
While the battery provides the initial power, the alternator is responsible for keeping it charged. This component is belt-driven and converts mechanical energy from the engine into electrical energy. As the engine runs, the alternator generates DC electricity, which is then used to power the car’s electrical components and recharge the battery. Without a functioning alternator, your battery will eventually drain, leaving you stranded.
Electricity’s Path Through the System
Electricity flows from the battery, acting as the power source, through a network of wires and circuits to various components. A simplified path might look like this: The battery’s positive terminal connects to a main power bus, distributing power to different circuits. Fuses and circuit breakers protect these circuits from overloads. From the main bus, power flows to individual components such as the headlights, radio, ignition system, and engine control unit (ECU).
The negative terminal of the battery completes the circuit, providing a return path for the electricity. The alternator then feeds back into the battery, replenishing its charge.
Simplified Car Electrical System Diagram
| Component | Function | Power Source | Power Path |
|---|---|---|---|
| Battery | Stores and provides DC electricity | Chemical reaction | Positive terminal to main power bus |
| Alternator | Generates DC electricity | Engine rotation | Main power bus and battery |
| Main Power Bus | Distributes electricity to various circuits | Battery and Alternator | Various circuits and components |
| Headlights, Radio, etc. | Car components | Main Power Bus | Ground (negative terminal of battery) |
Diagnosing Common Electrical Problems
So, you’ve got some weird electrical gremlins in your ride? Don’t panic! Troubleshooting car electrical issues can seem daunting, but with a systematic approach and a few basic tools, you can often pinpoint the problem and get back on the road. This section focuses on identifying common electrical problems and how to diagnose them. We’ll cover some key symptoms and straightforward testing methods.Identifying common symptoms and testing procedures allows for efficient diagnosis and repair of automotive electrical systems.
A methodical approach helps prevent unnecessary replacements and ensures accurate problem resolution.
Battery Problems
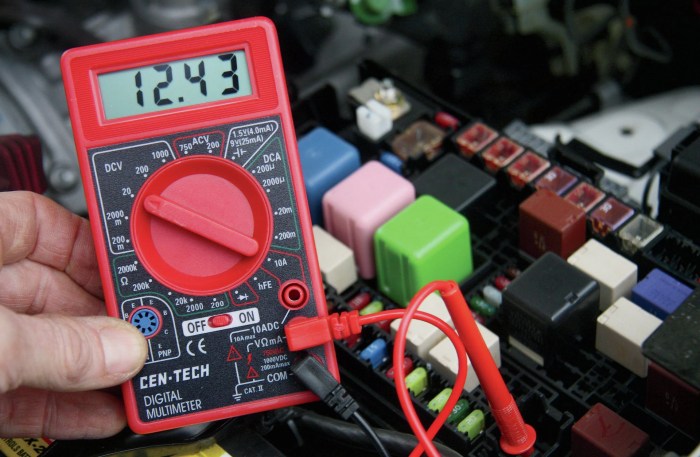
A weak or failing battery is a frequent culprit behind car electrical woes. Symptoms often manifest as slow cranking when you try to start your engine, or dimming headlights and interior lights. These indicate a reduced ability of the battery to deliver sufficient current. Testing the battery’s voltage is crucial. You’ll need a multimeter, which you can pick up at most auto parts stores for a reasonable price.
With the engine off, connect the multimeter’s probes to the battery terminals (positive to positive, negative to negative). A fully charged 12-volt battery should read around 12.6 volts. Anything significantly lower suggests a low state of charge. A reading below 12 volts might mean you need a recharge, while readings consistently below 11 volts usually indicate a dead or failing battery.
Keep in mind that voltage can drop slightly depending on the ambient temperature.
Alternator Issues
The alternator is your engine’s power generator, keeping the battery charged while the engine is running. A faulty alternator often presents itself with a warning light on your dashboard – typically a battery symbol. You might also notice unusual noises coming from the alternator, like a whining or squealing sound. If your battery consistently drains even after a full charge, it’s another strong indication of an alternator problem.
Testing the alternator output voltage while the engine is running is a common diagnostic step. Using your multimeter again, check the voltage at the battery terminals with the engine running. It should be around 13.5 to 14.5 volts. Readings significantly lower indicate that the alternator isn’t charging the battery properly.
Wiring Harness Inspection
A visual inspection of the wiring harnesses is a simple yet effective way to identify many electrical problems. Look for any signs of damage, such as frayed wires, broken insulation, or corrosion. Corrosion, often appearing as a greenish or whitish buildup on the connectors, can significantly impede the flow of electricity. Pay close attention to areas prone to moisture or abrasion, such as under the hood and near the battery.
A magnifying glass can help spot minor cracks or damage in the insulation that might otherwise go unnoticed. If you find any damaged wiring, carefully repair or replace it, ensuring proper insulation and secure connections. Remember to disconnect the battery’s negative terminal before working on any electrical components to prevent short circuits.
Testing Electrical Components
Okay, so you’ve got a handle on basic car electrical systems and diagnosed some common problems. Now it’s time to get your hands dirty and actually test some components. This involves using a multimeter, a pretty essential tool for any aspiring car mechanic. Knowing how to use it effectively will save you a lot of time and frustration.
Battery and Alternator Voltage Testing
Using a multimeter to check the battery and alternator voltage is a fundamental step in troubleshooting electrical issues. A properly functioning battery should show around 12.6 volts when not charging. The alternator, responsible for keeping the battery charged while the engine runs, should produce around 13.5 to 14.5 volts. To test the battery, connect the multimeter’s probes to the battery terminals (positive to positive, negative to negative).
For the alternator, you’ll need to have the engine running; then, measure the voltage at the battery terminals again. Low voltage in either case points to a potential problem.
Fuse and Circuit Continuity Testing
Fuses and circuits are the pathways for electricity. Testing their continuity ensures these pathways are clear. A blown fuse will show no continuity – essentially an open circuit. A multimeter set to the continuity setting (usually indicated by a diode symbol) will beep if the circuit is complete and show an open circuit if it’s broken. To test a fuse, remove it and place the multimeter probes on its metal ends.
Testing circuit continuity involves placing one probe at the power source and the other at the component’s connection point; a beep indicates a complete circuit. Remember to disconnect the circuit from the power source before testing to avoid shocks.
Relay and Switch Functionality Testing
Relays and switches are essentially electrical on/off switches, but relays use electromagnets to do the switching. Testing their functionality involves checking if they correctly switch the circuit on and off. For relays, use the multimeter in continuity mode to check if the relay is properly engaging and disengaging the circuit when activated. For switches, you can use the multimeter in voltage mode to check for continuity across the switch terminals when it’s turned on and off.
Common Electrical Component Tests
| Component | Test | Expected Result |
|---|---|---|
| Battery | Measure voltage with multimeter (engine off) | 12.6V (approximately) |
| Alternator | Measure voltage with multimeter (engine running) | 13.5V – 14.5V (approximately) |
| Fuse | Check continuity with multimeter | Continuity (beep) if good, no continuity (no beep) if blown |
| Circuit | Check continuity with multimeter | Continuity (beep) if good, no continuity (no beep) if open |
| Relay | Check continuity with multimeter when activated and deactivated | Continuity should change when the relay is activated |
| Switch | Check continuity with multimeter in different switch positions | Continuity should change with switch positions |
Troubleshooting Starting Problems
So, your car won’t start. It’s a frustrating experience, but before you panic and call a tow truck, let’s systematically troubleshoot the electrical aspects. Many starting problems stem from electrical gremlins, and with a little knowledge and some basic tools, you can often diagnose and fix the issue yourself. This section focuses on the electrical components that prevent your engine from turning over.
Electrical starting problems usually boil down to issues with the battery, the cables connecting the battery to the starter, the starter motor itself, or the ignition switch. Sometimes, a faulty neutral safety switch (which prevents starting unless the car is in park or neutral) can also be the culprit, but we’ll concentrate on the more common electrical suspects here.
Battery Connections and Cables
Inspecting the battery terminals and cables is the first step in diagnosing a no-start condition. Loose or corroded connections prevent the flow of current, hindering the starter motor from receiving the necessary power. Corrosion appears as a whitish-green buildup on the terminals and clamps.
To check the battery connections and cables, first locate the battery, usually under the hood. Then, carefully examine the positive (+) and negative (-) terminals for any corrosion. Use a wire brush or battery terminal cleaner to remove any corrosion. Next, check the tightness of the cable clamps on both terminals. They should be firmly secured.
If the cables are loose, tighten them with a wrench. If the cables themselves are damaged or frayed, they should be replaced. Remember to disconnect the negative (-) terminal first before working on the battery or its connections to prevent accidental short circuits.
Testing the Starter Motor and Solenoid
The starter motor is the powerful electric motor that cranks the engine, and the solenoid acts as a switch, connecting the battery to the starter motor when the ignition key is turned. Testing these components requires some basic electrical knowledge and tools, like a multimeter.
Testing the solenoid usually involves checking for continuity (a complete electrical path) between its terminals using a multimeter. If there’s no continuity, the solenoid is likely faulty. Testing the starter motor is a bit more involved and often requires removing it from the vehicle. A faulty starter might show resistance or a lack of current flow when tested with a multimeter.
A visual inspection for damage or burnt components is also recommended. However, if you are not comfortable with this, it’s best to take it to a professional.
Troubleshooting Starting Problems Flowchart
A systematic approach is key to efficiently diagnosing starting problems. This flowchart Artikels a logical sequence for troubleshooting.
Follow these steps in order. If a step resolves the issue, you’re done! If not, proceed to the next step.
- Check Battery Terminals and Cables: Inspect for corrosion and looseness. Clean and tighten as needed. Replace damaged cables.
- Check Battery Voltage: Use a multimeter to measure the battery voltage. It should be around 12.6 volts when fully charged. A low voltage indicates a weak or dead battery.
- Check for Battery Drain: If the battery is fully charged but still won’t start, there might be a parasitic drain somewhere in the electrical system. This requires further investigation using a multimeter to identify the source of the drain.
- Test the Starter Solenoid: Check for continuity between the solenoid terminals using a multimeter.
- Test the Starter Motor: (Advanced step; may require removal of the starter) Check for continuity and current flow using a multimeter.
- Check Ignition Switch: Ensure the ignition switch is functioning correctly. A faulty switch may prevent the starter circuit from completing.
- Check Neutral Safety Switch (Automatic Transmission): Verify that the transmission is in Park or Neutral. A faulty neutral safety switch will prevent the starter from engaging.
Addressing Lighting Issues

Car lighting systems are crucial for safety and visibility, both for you and other drivers. Troubleshooting these systems can range from simple bulb replacements to more complex wiring diagnoses. Understanding the different components and their functions is key to effectively addressing lighting problems.
So, you’re dealing with wonky car electrics? First, check the battery and fuses – that’s usually the easiest fix. But if you’re facing something seriously complex, maybe it’s time for an upgrade? I mean, if you’re thinking big, check out this Lamborghini Aventador SVJ for sale 2025 ; its electrical system is probably way less likely to give you problems.
Then again, maybe stick to the basics first; a multimeter is your best friend for troubleshooting those pesky electrical gremlins.
Automotive Lighting Systems Overview
Automotive lighting systems encompass various components, each serving a specific purpose. Headlights illuminate the road ahead, while taillights, brake lights, and turn signals warn other drivers of your vehicle’s position and intentions. Other systems, such as fog lights, reverse lights, and interior lights, further enhance visibility and convenience. These systems typically share common elements such as bulbs, wiring harnesses, fuses, and switches, but their individual circuits often operate independently.
Troubleshooting Malfunctioning Headlights
Headlight failure is a common issue. The first step is to check the bulbs themselves. This involves accessing the headlight assembly (often requiring removal of a cover or access panel), carefully removing the faulty bulb, and comparing it to a new bulb of the correct type and wattage. Incorrect bulb installation is a frequent cause of failure.
If the bulb is the problem, replace it with an identical one. If the problem persists, the issue may lie in the wiring or the headlight switch. A visual inspection of the wiring harness for damage, loose connections, or corrosion is recommended. Using a multimeter to test for continuity in the wiring circuit will help pinpoint a break or short circuit.
Finally, the headlight switch itself could be faulty and may need to be replaced.
Diagnosing Taillight, Brake Light, and Turn Signal Problems
Troubleshooting taillights, brake lights, and turn signals often follows a similar process. Begin by checking the bulbs. These are usually easier to access than headlights. If the bulbs are fine, inspect the wiring harness for damage, loose connections, or corrosion. A malfunctioning brake light switch can also cause brake light failure.
This switch is usually located near the brake pedal and can be tested with a multimeter. For turn signals, a faulty turn signal switch or flasher relay could be the culprit. The flasher relay is a small electrical component that controls the blinking rate of the turn signals; a clicking sound from the relay may indicate a failure.
A multimeter can be used to test the continuity of the turn signal switch and the flasher relay.
Potential Causes for Lighting System Failures
A thorough understanding of potential failure points is essential for efficient troubleshooting. Here are some common causes:
- Burned-out bulbs: This is the most frequent cause and usually the easiest to fix.
- Blown fuses: A blown fuse will interrupt the circuit to protect the wiring. Check the fuse box for a blown fuse corresponding to the affected lighting circuit.
- Damaged wiring: Wiring can become damaged due to age, wear, or rodent activity. Look for breaks, fraying, or corrosion in the wiring harness.
- Faulty switches: The headlight switch, brake light switch, or turn signal switch can fail, interrupting the circuit.
- Defective flasher relay: A faulty flasher relay will prevent the turn signals from flashing correctly.
- Corrosion in connectors: Corrosion can build up on electrical connectors, creating high resistance or an open circuit.
- Short circuits: A short circuit can cause a sudden surge of current, potentially damaging components or blowing a fuse.
Dealing with Electrical Accessory Problems
Car electrical accessories, while convenient, can be a source of frustration when they malfunction. Understanding the common failure points and troubleshooting techniques can save you time and money, preventing unnecessary trips to the mechanic. This section will guide you through diagnosing problems with some of the most frequently used accessories.
Power Window Malfunctions
Power window problems are surprisingly common, often stemming from simple issues. A systematic approach to troubleshooting is key. First, check the obvious: is the fuse blown? Consult your owner’s manual to locate the correct fuse for your power windows and use a test light or multimeter to verify its integrity. A blown fuse indicates a short circuit somewhere in the system; replacing it temporarily may allow you to operate the window again, but the underlying issue needs to be addressed to prevent the fuse from blowing again.
If the fuse is fine, the next step is to examine the window switch itself. A faulty switch can prevent the window from moving, even with a good fuse. You can test the switch using a multimeter to check for continuity when pressed. If the switch is faulty, it will need to be replaced. Finally, if both the fuse and the switch check out, the problem might lie within the window regulator mechanism itself, which may require professional repair or replacement.
This involves the motor, gears, and cables that move the window up and down.
Car Radio and Infotainment System Issues
Modern car radios and infotainment systems are complex pieces of technology, prone to a variety of problems. A common issue is a lack of power. Start by ensuring the radio is properly connected to the vehicle’s electrical system. Check the fuses dedicated to the radio; many vehicles have separate fuses for the radio and other infotainment components. If the fuses are intact, examine the connections at the back of the radio unit itself.
Loose or corroded connections can interrupt the power supply. Beyond power issues, software glitches or hardware failures can also lead to malfunctions. Attempting a factory reset (if your system allows it) might resolve minor software bugs. However, more serious hardware problems usually necessitate professional diagnosis and repair. For example, a failing amplifier could result in poor sound quality or complete audio loss.
Systematic Troubleshooting of Electrical Accessory Problems
A methodical approach to troubleshooting electrical accessory issues is essential for efficient diagnosis. The following steps provide a framework:
- Visual Inspection: Begin by visually inspecting the accessory and its surrounding wiring for any obvious damage, loose connections, or corrosion.
- Fuse Check: Check the relevant fuses using a test light or multimeter. Replace any blown fuses.
- Power Supply Test: Use a multimeter to check for power at the accessory’s connection points. This verifies if power is reaching the accessory itself.
- Component Testing: If power is present, test the individual components of the accessory (switch, motor, etc.) using a multimeter to identify faulty parts.
- Wiring Inspection: If other steps fail to identify the problem, carefully inspect the wiring harness for breaks, shorts, or other damage.
- Professional Assistance: If you’re unable to pinpoint the issue after these steps, it’s advisable to seek professional assistance from a qualified auto electrician.
Remember to always disconnect the negative battery terminal before working on any car electrical system to prevent short circuits and potential injury. Safety should always be your top priority.
Safety Precautions for Electrical Work
Working on your car’s electrical system can be rewarding, but it’s crucial to prioritize safety. A seemingly small mistake can lead to serious injury, from electric shock to burns, or even damage to your vehicle’s electrical components. Taking the necessary precautions will minimize risks and ensure a successful repair.Disconnecting the battery is the single most important safety step before undertaking any electrical repairs.
This prevents accidental shorts, sparks, and potential injury from the vehicle’s electrical system. It also protects sensitive electronic modules from damage caused by unexpected voltage surges or incorrect connections during the repair process. Always remember that even with the battery disconnected, some electrical components might still retain a charge, so caution is always advised.
Battery Disconnection Procedure
Before disconnecting the battery, ensure the vehicle’s ignition is off. Locate the battery, usually found under the hood or in the trunk. First, disconnect the negative (-) terminal using a wrench, carefully removing the cable clamp. Then, disconnect the positive (+) terminal, again carefully removing the clamp. Keep the wrench and cables away from any metal parts of the vehicle to avoid accidental short circuits.
After the repair is complete, reconnect the positive (+) terminal first, followed by the negative (-) terminal.
Safe Handling of Tools and Equipment
Proper handling of tools and equipment is essential to avoid electrical shocks and injuries. Always use insulated tools designed for electrical work to prevent direct contact with live wires. Avoid working on wet surfaces, as this increases the risk of electric shock. Inspect tools before each use to ensure that insulation is intact and there are no damaged or loose parts.
So, you’re dealing with wonky car electrics? First, check your battery and fuses – that’s usually the easiest fix. If it’s something more serious, though, you might need a pro, especially if the problem’s costing you more than the Pagani Huayra R price in USD – which, let’s be real, is a whole other level of expensive.
Anyway, back to your car – try tracing the wiring diagrams before calling a mechanic; sometimes it’s a simple loose connection.
Keep your workspace clean and organized to minimize tripping hazards and accidental contact with tools or wires. Never wear loose clothing or jewelry that could get caught in moving parts or make contact with electrical components.
Essential Safety Tools and Equipment
Proper tools are critical for safe and effective electrical repairs. Having the right equipment readily available can prevent frustrating delays and reduce the risk of accidental damage or injury.
- Insulated screwdrivers (Phillips and flathead): These are essential for working with various electrical connections.
- Insulated pliers (needle-nose and slip-joint): These are helpful for manipulating wires and connectors in tight spaces.
- Multimeter: A multimeter is crucial for testing voltage, current, and resistance in electrical circuits, ensuring components are functioning correctly and identifying faulty parts.
- Wire strippers/cutters: These tools are used to safely prepare wires for connections, preventing damage to the wire’s insulation.
- Protective eyewear: Always wear safety glasses to protect your eyes from flying debris or sparks.
- Insulated gloves: These protect your hands from electrical shocks and potential burns.
- Battery terminal cleaner: A clean battery connection is crucial for reliable electrical function and safety.
Advanced Troubleshooting Techniques
So, you’ve tackled the basics of car electrical systems and diagnosed some common problems. Now let’s dive into some more advanced techniques that will help you conquer even the trickiest electrical gremlins. These techniques require a bit more specialized knowledge and tools, but mastering them will significantly enhance your troubleshooting skills.
Wiring Diagram Usage
Wiring diagrams are your best friend when tracing electrical circuits. These detailed schematics show the path of each wire, the location of connectors, and the components connected to each circuit. By following the diagram, you can systematically trace a circuit from its power source to its destination, identifying any breaks, shorts, or other problems along the way. For instance, if your headlights aren’t working, you can use the diagram to follow the circuit from the battery, through the switch, to the headlights themselves, checking for continuity at each point.
Understanding the symbols used in wiring diagrams is crucial; a good automotive repair manual will provide a legend explaining these symbols. Remember, always disconnect the negative battery terminal before working with any electrical components.
Diagnostic Scanner Use
Modern vehicles are packed with electronic control modules (ECMs) that constantly monitor various systems. A diagnostic scanner, often called an OBD-II scanner, can connect to your car’s computer and retrieve diagnostic trouble codes (DTCs). These codes provide clues about the location and nature of electrical faults. For example, a code might indicate a malfunctioning oxygen sensor, a problem with the ABS system, or a short circuit in a specific circuit.
Different scanners have varying capabilities; some only read codes, while others allow you to view live data streams, perform actuator tests, and even reprogram modules. Knowing how to interpret these codes and use the scanner’s features effectively is essential for efficient troubleshooting.
Damaged Wiring Harness Repair
Damaged wiring harnesses can be a real headache. These harnesses bundle multiple wires together, making it difficult to pinpoint the source of a problem. Repairing a damaged harness involves carefully tracing the affected wires, identifying the break or short, and then either splicing in new wire or replacing the damaged section entirely. You’ll need tools like wire strippers, crimpers, heat shrink tubing, and possibly a soldering iron for a professional-looking repair.
When splicing wires, ensure you use the correct gauge wire and properly insulate the connections to prevent shorts or corrosion. It’s crucial to follow the correct wiring color codes to ensure proper functionality. Incorrect repairs can lead to further problems and potentially even safety hazards.
Diagnostic Trouble Code (DTC) Interpretation
Diagnostic trouble codes (DTCs) are alphanumeric codes that indicate specific problems within a vehicle’s systems. These codes are generated by the vehicle’s onboard computer and can be retrieved using a diagnostic scanner. Understanding how to interpret these codes is crucial for efficient troubleshooting. For example, a code like P0171 might indicate a lean condition in bank 1 of the engine, pointing to a potential issue with the air/fuel mixture.
A reliable repair manual or online DTC database will provide detailed descriptions of each code and possible causes. It’s important to note that DTCs only provide a starting point for diagnosis; further investigation may be necessary to pinpoint the root cause of the problem.
Ultimate Conclusion: How To Troubleshoot Car Electrical Problems
So, there you have it – a comprehensive guide to tackling those pesky car electrical problems! Remember, safety first – always disconnect the battery before working on your car’s electrical system. With a little knowledge and the right tools, you can confidently diagnose and even fix many common issues, saving yourself time, money, and the frustration of a dead battery on a cold morning.
From understanding basic circuits to using a multimeter, this guide empowers you to take control of your car’s electrical health. Now go forth and conquer those electrical gremlins!