How to install a turbo timer at home – How to install a turbo timer at home? Sounds intimidating, right? But trust me, it’s way less scary than it seems. This guide will walk you through the whole process, from understanding what a turbo timer even
-does* to making sure your car doesn’t spontaneously combust. We’ll cover everything from gathering your tools to troubleshooting those inevitable little hiccups.
Get ready to become a turbo-timer-installing badass.
This guide breaks down the installation process into manageable steps, addressing the different types of turbo timers, wiring considerations, and programming specifics. We’ll even throw in some handy tips and tricks to help you avoid common pitfalls. By the end, you’ll be confident in your ability to install a turbo timer, saving you money and potentially extending the life of your turbocharger.
Understanding Turbo Timers
Okay, so you’re thinking about installing a turbo timer. Smart move, especially if you’ve got a turbocharged car. But before you jump into the wiring, let’s get a solid grasp on what these things actually do and why you might want one. Basically, a turbo timer keeps your turbocharger spinning for a short period after you shut off the engine.
This is important because turbochargers get incredibly hot during operation.A turbo timer’s main function is to allow the turbocharger to cool down gradually. Without a timer, the intense heat can cause damage to the turbo’s bearings and seals, leading to premature wear and costly repairs. This is because the oil film lubricating the turbo can break down under extreme heat, causing metal-to-metal contact and potential failure.
Extending the cooling period prevents this by allowing the oil to continue circulating and cooling the components. The benefits? Longer turbo lifespan, improved reliability, and ultimately, saving you money on repairs.
Types of Turbo Timers
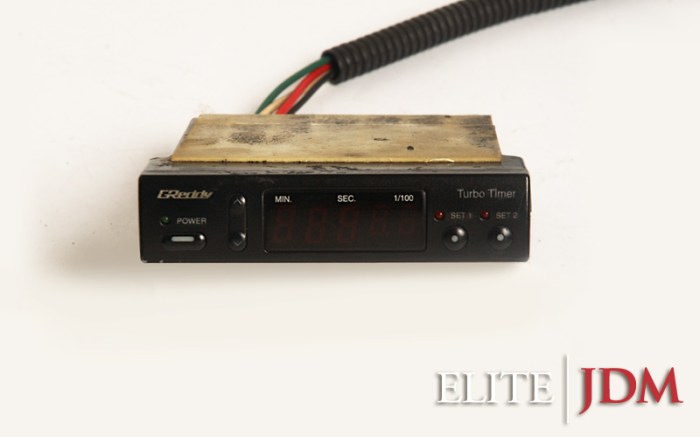
There are primarily two main types of turbo timers: standalone units and integrated units. Standalone timers are independent devices that require separate wiring and installation. They typically have a digital display and various adjustable settings, offering more customization options. Integrated timers, on the other hand, are often built into aftermarket ECU (Engine Control Unit) systems or even some higher-end factory systems.
These are usually more seamlessly integrated into the car’s electronics, but offer less adjustability.
Turbo Timer Installation Methods
Choosing an installation method depends on your comfort level with automotive electronics and your car’s specific setup. The most common methods are professional installation, DIY installation using a wiring harness, and DIY installation by directly tapping into the car’s wiring. Professional installation is the most expensive but guarantees proper functionality and avoids potential damage to your vehicle’s electrical system.
A wiring harness provides a more straightforward DIY installation, minimizing the risk of wiring mistakes, but still requires some technical knowledge. Direct wiring offers the most control but presents the highest risk of damaging your car’s electrical system if not done correctly. Therefore, careful planning and knowledge of your car’s wiring diagram are crucial for successful direct wiring.
Pre-Installation Preparations
Okay, so you’re ready to install a turbo timer? Awesome! Before you even think about touching your car’s wiring, let’s make sure we’re fully prepped. Proper preparation is key to a smooth and safe installation. This section covers the essential tools, materials, and safety procedures you’ll need.
Necessary Tools and Materials
Gathering the right tools and materials beforehand saves you time and frustration. Having everything readily available minimizes the chance of interruptions during the installation process. It also ensures you have everything you need to complete the job correctly and safely.
- Turbo timer unit (obviously!)
- Wiring harness (specific to your turbo timer and car model)
- Wire strippers/cutters
- Electrical tape (high-quality, weatherproof)
- Crimping tool (for connecting terminals)
- Wire connectors (various sizes)
- Test light or multimeter (for checking electrical connections)
- Socket wrench set (for battery terminal removal)
- Screwdrivers (Phillips and flathead)
- Zip ties or Velcro straps (for cable management)
- Owner’s manual for your car and the turbo timer
Safely Disconnecting the Car Battery
Disconnecting your car battery is crucial for safety. This prevents accidental shorts or damage to your car’s electrical system during the installation. Always remember to disconnect the negative (-) terminal first and reconnect the positive (+) terminal last.
- Locate your car’s battery (usually under the hood, but check your owner’s manual if unsure).
- Using the socket wrench, loosen the nut securing the negative (-) terminal cable.
- Carefully remove the negative (-) terminal cable from the battery post.
- Repeat steps 2 and 3 for the positive (+) terminal cable.
- Set the cables aside, ensuring they don’t touch each other or any metal parts of the engine bay.
Compatible Car Models and Turbo Timer Types
Choosing the right turbo timer is essential for proper functionality and compatibility. This table provides examples; always consult your turbo timer’s documentation for a complete list of compatible vehicles and ensure the wiring harness matches your car’s specifications.
| Car Model | Year | Turbo Timer Type | Notes |
|---|---|---|---|
| Subaru WRX STI | 2015-2023 | Hall-effect sensor type | May require additional wiring |
| Mitsubishi Lancer Evolution X | 2008-2015 | Voltage sensing type | Simple installation for this model |
| Nissan GT-R (R35) | 2009-2023 | OBD-II plug-in type | Check for specific OBD-II port compatibility |
| Honda Civic Type R (FK8) | 2017-2021 | Hall-effect sensor type | Requires careful wiring to avoid interference |
Wiring and Connections
Okay, so you’ve got your turbo timer and you’re ready to wire it in. This is the most crucial part of the installation, so pay close attention to detail. Getting this wrong can fry your electronics, so double and triple-check everything before you turn the ignition on.This section will guide you through identifying the correct wires in your car’s wiring harness and then safely connecting them to your turbo timer.
Remember, consult your turbo timer’s specific instructions; wiring diagrams vary slightly between models. Safety first! Always disconnect the negative battery terminal before starting any electrical work.
Identifying Wiring Harness Connections
Proper identification of your vehicle’s wiring harness is paramount. You’ll need to locate three key wires: a constant power source (usually a 12V+ wire), an ignition switched power wire (only live when the ignition is on), and a ground wire. The best way to find these is to consult your vehicle’s wiring diagram. These diagrams are often available online or in your owner’s manual.
Alternatively, you can use a multimeter to test wires and identify their function. A constant 12V+ wire will show power regardless of the ignition status, while an ignition switched wire will only show power when the ignition is turned on. A ground wire will offer a low resistance path to the vehicle’s chassis. Incorrectly identifying these wires can lead to malfunctions or damage.
Connecting the Wires
Once you’ve identified the correct wires, you’ll need to connect them to your turbo timer. Most turbo timers use a standard color-coding system, but always refer to your specific model’s instructions. Typically, you’ll find wires for constant power (often red), ignition power (often yellow or orange), and ground (usually black). Connect the constant power wire from the turbo timer to the constant 12V+ wire in your vehicle’s harness.
Similarly, connect the ignition wire from the turbo timer to the ignition switched wire. Finally, connect the ground wire from the turbo timer to a clean, grounded metal surface on your vehicle’s chassis. Secure all connections with electrical tape to prevent shorts.
Wiring Diagram Example
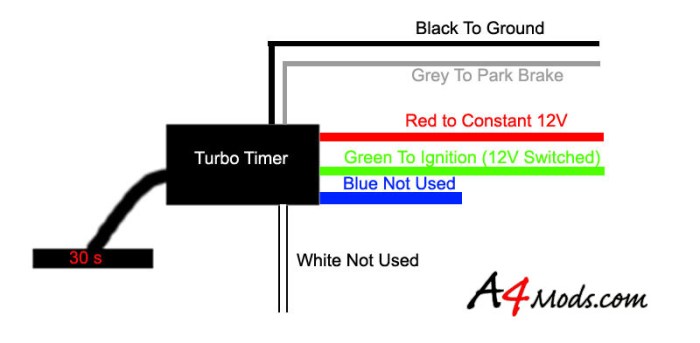
Imagine a diagram showing a simplified wiring setup. A battery symbol (+) is connected to a red wire labeled “Constant 12V+ (from vehicle harness)”. This red wire is connected to a red wire labeled “Constant 12V+ (to turbo timer)”. A second wire, yellow, labeled “Ignition Switched (from vehicle harness)” connects to a yellow wire labeled “Ignition Switched (to turbo timer)”.
Finally, a black wire labeled “Ground (from vehicle harness)” is connected to a black wire labeled “Ground (to turbo timer)”, and then to a ground symbol (a triangle with a horizontal line at the bottom). This represents a connection to a clean, grounded metal surface in the vehicle. All connections are shown with small, secure knots indicating proper electrical tape application.
Remember, this is a simplified example; your actual wiring may differ based on your vehicle and turbo timer model. Always consult your specific instructions.
Programming and Setup
Okay, so you’ve wired up your turbo timer. Now comes the crucial part: making sure it actually works and is set up for your specific needs. This involves programming the timer’s settings and then testing everything out to make sure it’s all running smoothly. We’ll cover both those steps, along with some tips for fine-tuning your settings.Programming your turbo timer usually involves interacting with a small control panel or buttons on the device itself.
The exact process will depend heavily on the specific model you’ve installed. Consult your turbo timer’s manual for precise instructions. Generally, you’ll be setting the cooldown time (how long the engine runs after you turn the key off), and possibly adjusting boost control features if your timer allows for it. Boost control features, if available, will usually allow you to limit boost pressure during the cooldown period to help prevent damage.
Turbo Timer Duration Settings
Setting the correct cooldown time is critical. Too short, and your turbocharger won’t cool down properly, leading to potential damage. Too long, and you’re wasting fuel and potentially stressing other engine components. Most turbo timers offer a range of settings, typically from 1 to 5 minutes. A good starting point for most applications is around 2-3 minutes, especially for regularly driven vehicles.
So you’re thinking about installing a turbo timer yourself – totally doable, right? Just remember to check your car’s manual first. But before you get started, make sure your Georgia car insurance is up to date; you can check the specifics on Georgia car insurance grace period laws here to avoid any surprises. Once you’re sure about that, grab your tools and let’s get that turbo timer installed!
If you frequently drive aggressively or frequently experience high boost pressures, you might consider a slightly longer cooldown time, up to 4 minutes. For cars driven more gently or in cooler climates, you might find a shorter time is sufficient.
Boost Control Settings (If Applicable), How to install a turbo timer at home
Not all turbo timers offer boost control. If yours does, you’ll be able to adjust the boost pressure during the cooldown period. This is usually expressed as a percentage of your maximum boost. For example, a setting of 50% would limit boost to half of your maximum boost pressure during the cooldown cycle. Reducing boost pressure during cooldown helps to reduce heat stress on the turbocharger bearings and seals.
A reasonable starting point would be to set the boost to around 50% or lower of your peak boost pressure during your programming session. You may want to experiment to find the optimal setting that balances cooldown efficiency and engine performance.
Testing Turbo Timer Functionality
After programming, it’s essential to test your turbo timer’s functionality. Start your car and let it reach operating temperature. Drive the car until the turbo is fully engaged and the boost pressure is built up, then turn off the ignition. Listen carefully. You should hear the engine continue running for the duration you programmed into the timer.
Observe the boost gauge if you have one; it should indicate that boost pressure is gradually decreasing during the cooldown period. If the engine shuts off immediately or doesn’t run for the programmed time, you’ll need to troubleshoot your wiring and settings.
Adjusting Settings Based on Driving Habits
The ideal turbo timer settings are subjective and depend on your driving style and environment. If you frequently drive aggressively or tow heavy loads, a longer cooldown time (e.g., 3-4 minutes) may be necessary. If you mainly drive in city traffic or in cooler climates, a shorter cooldown time (e.g., 1-2 minutes) might suffice. Regularly monitor your turbocharger’s temperature (if you have a gauge) and adjust the timer settings accordingly.
If you notice consistently high turbocharger temperatures even with a longer cooldown period, you might want to consult a mechanic to rule out any underlying issues. Remember, the goal is to ensure the turbocharger cools down adequately without unnecessarily prolonging engine operation.
Troubleshooting and Safety
Installing a turbo timer might seem straightforward, but things can go wrong. Understanding potential issues and taking appropriate safety precautions is crucial to avoid damaging your car’s electrical system or causing other problems. This section covers common problems and their solutions, along with important safety advice.Troubleshooting a malfunctioning turbo timer often involves systematically checking power supply, wiring connections, and the timer’s programming.
Remember, working with your car’s electrical system requires care and attention to detail; incorrect connections can lead to blown fuses, damaged components, or even a fire.
Common Installation Problems and Solutions
A few common issues arise during turbo timer installation. These often stem from incorrect wiring, faulty components, or programming errors. Addressing these problems systematically can prevent significant headaches.
- No Power to the Turbo Timer: This is usually due to a blown fuse, a faulty connection in the power wire, or a problem with the ignition wire connection. Check your car’s fuse box for a blown fuse related to the accessory power circuit. Inspect all wire connections for tightness and corrosion. If the problem persists, use a multimeter to check for voltage at the power and ignition wire connections.
- Incorrect Timing: The turbo timer may not be programmed correctly, resulting in too short or too long a run time. Double-check the programming steps and ensure the timer’s settings match your desired run time. Consult your turbo timer’s manual for specific programming instructions. Incorrectly programmed timers can lead to premature wear on your turbocharger.
- Intermittent Operation: This could indicate a loose wire connection, a faulty relay, or a problem with the timer itself. Carefully examine all wiring connections and replace any suspect components. If the issue persists after thorough inspection, it may be necessary to replace the turbo timer unit.
Safety Precautions During Installation
Working with your car’s electrical system requires caution. Improper handling can lead to serious consequences. The following safety measures should be observed during the installation process.
- Disconnect the Battery: Before starting any work, always disconnect the negative (-) terminal of your car battery. This prevents accidental shorts and protects you from electric shock.
- Use Insulated Tools: Employ insulated screwdrivers, pliers, and other tools to avoid accidental contact with live wires.
- Protect Wiring: Use electrical tape or heat-shrink tubing to insulate all wire connections and prevent shorts. Avoid placing wires near moving parts or hot surfaces.
- Consult a Professional: If you are uncomfortable working with car electronics, consult a qualified mechanic or automotive electrician. Improper installation can lead to damage to your vehicle’s electrical system.
Using a Multimeter for Troubleshooting
A multimeter is an invaluable tool for diagnosing electrical problems. It allows you to measure voltage, current, and resistance, helping you pinpoint the source of a malfunction. For example, if your turbo timer isn’t receiving power, you can use a multimeter to check for voltage at the power wire connection. If no voltage is present, the problem lies upstream, possibly a blown fuse or a loose connection.
If voltage is present, the problem may lie within the timer itself. Always refer to your multimeter’s instructions for safe and proper usage.
Post-Installation Checks: How To Install A Turbo Timer At Home
After you’ve wrestled with the wiring and finally got your turbo timer installed, the crucial next step is verifying that everything works as planned. A malfunctioning timer can lead to serious engine damage, so a thorough check is absolutely essential. This involves confirming the timer’s functionality and ensuring it’s accurately interacting with your car’s systems. Think of this as your final exam – you don’t want to fail after all that hard work!This section details how to test the turbo timer’s operation, monitor its performance over time, and troubleshoot potential problems.
Remember, a little preventative maintenance goes a long way in preserving your engine’s health and the lifespan of your new turbo timer.
Turbo Timer Functionality Verification
The first step is a simple operational check. Start your car and let it run for a few minutes to reach normal operating temperature. Then, turn the ignition off. The turbo timer should activate, keeping the engine running for the pre-programmed time. Observe the engine’s operation during this period.
Listen for any unusual noises or vibrations. If the engine stalls prematurely or the timer doesn’t activate, there’s a problem that needs immediate attention. A visual check of the timer’s display (if it has one) can also confirm that the countdown is working correctly. Compare the displayed time with the programmed time to verify accuracy.
So, you’re trying to install a turbo timer yourself – totally doable, right? Just remember to check your car’s manual first. But hey, if you’re dealing with financial headaches, like messing up your car loan payments and needing to fix credit report errors, check out this guide on How to dispute auto loan errors on credit report to get that sorted.
Once your finances are in order, you can get back to that turbo timer install without stressing about payments.
Monitoring Turbo Timer Performance
After the initial check, it’s important to monitor the turbo timer’s performance over several driving cycles. Pay close attention to how long the engine runs after you switch off the ignition. Inconsistent run times might indicate a faulty connection or a problem with the timer’s internal circuitry. Keep a log of your driving sessions and the corresponding turbo timer run times to track any inconsistencies.
This approach allows you to identify potential issues early on, before they escalate into more significant problems. For instance, if you notice the timer consistently runs for a shorter period than programmed, it could be a sign of a low voltage issue.
Troubleshooting Common Issues
It’s always good to be prepared, so here’s a list of potential problems and their solutions. Remember, always disconnect the battery’s negative terminal before working on any electrical components.
- Problem: Turbo timer doesn’t activate.
Solution: Check all wiring connections for proper seating and continuity. Ensure the power source is adequate and the timer is correctly grounded. Review your wiring diagram to ensure correct connections to the ignition and power circuits. - Problem: Turbo timer activates but shuts off prematurely.
Solution: Verify the timer’s programming settings. Check the wiring for short circuits or loose connections. Inspect the timer’s internal components for any signs of damage or malfunction. Consider a low voltage issue if the problem is intermittent. - Problem: Engine runs rough during turbo timer operation.
Solution: This could indicate a problem unrelated to the timer, such as a fuel or ignition system issue. A thorough engine diagnostic is recommended. - Problem: Timer display is malfunctioning (if applicable).
Solution: Check the timer’s power supply and connections. If the problem persists, the timer’s internal display may be faulty and require replacement.
Visual Aids
Visual aids are crucial for understanding the turbo timer installation process. Clear images can prevent errors and ensure a safe and effective installation. The following descriptions provide detailed visual representations of key steps.
Turbo Timer Control Unit Placement
Imagine a picture showing the turbo timer control unit neatly secured under the dashboard, away from any moving parts or extreme temperatures. The unit is mounted using Velcro straps or double-sided tape, ensuring it’s firmly attached but easily accessible for programming or adjustments. Wires are routed neatly and tucked away to avoid interference with other components or creating a hazard.
The unit itself is facing upwards for easy access to the display and buttons. The location chosen minimizes potential damage from vibrations and allows for optimal signal reception from the connected wires. This specific placement prioritizes ease of access and minimizes the risk of accidental damage or interference with other car components.
Wiring Harness Connections
The image depicts the wiring harness clearly labeled, showing each wire connected to its corresponding location in the car’s electrical system. The illustration clearly shows the power wire (typically red) connected to a switched 12V power source (ignition), the ground wire (typically black) connected to a clean chassis ground point, and the other wires connected to the appropriate signals (e.g., ignition, tachometer).
Each connection is shown using color-coded wires matching the instructions provided in the turbo timer’s manual. The harness itself is neatly bundled and secured using zip ties to prevent loose wires from interfering with other components. The image emphasizes the importance of secure and correct connections to prevent malfunctions or electrical shorts. For instance, a wrong connection between the ignition and the tachometer wire can lead to the turbo timer not functioning correctly.
Turbo Timer Relay Positioning
The picture shows the turbo timer relay mounted securely in a fuse box or other suitable location, with all connections clearly visible. The relay is properly oriented, ensuring that the contacts are correctly aligned with the wiring harness. The image shows the relay’s power input connected to the battery, its control input connected to the turbo timer’s output, and its output connected to the power source for the turbo timer.
The relay is firmly attached using the provided mounting hardware, preventing it from moving or vibrating loose. The wiring to and from the relay is neatly organized and secured with zip ties. This particular image highlights the importance of choosing a location that allows for sufficient airflow to prevent overheating and protects the relay from moisture and debris.
A poorly placed relay could lead to overheating, malfunction, and even fire hazards.
Wrap-Up
So there you have it – you’ve successfully navigated the world of turbo timer installation! Remember, patience and attention to detail are key. While this might seem like a complex project, following these steps will dramatically increase your chances of a successful installation. Now go forth and enjoy the benefits of a properly installed turbo timer – longer turbo life and a happier engine.
Don’t forget to brag to your friends about your newfound DIY skills!