Best tire repair kits for road trips? Dude, seriously, flat tires suck. They’re the absolute worst when you’re miles from anywhere, right? This isn’t some stuffy guide; we’re talking about getting you back on the road ASAP. We’ll break down the best kits, what to look for, and how to actually use the darn thing.
Think of this as your survival guide for avoiding a roadside meltdown.
We’ll cover everything from the different types of kits (plug kits, patch kits, compressor kits – oh my!) to choosing the right one for your ride. We’ll even walk you through how to fix that flat, step-by-step, with enough detail that even your grandma could do it (almost). We’ll also discuss when a kit
-won’t* cut it and you need to call for backup.
Plus, we’ll throw in some extra road trip essentials to keep you safe and sound.
Introduction to Tire Repair Kits for Road Trips
So, you’re planning a road trip – awesome! But before you hit the open road, there’s one crucial item you shouldn’t leave home without: a tire repair kit. A flat tire can turn a scenic drive into a major headache, potentially stranding you for hours, costing you money, and ruining your vacation vibe. Having a reliable tire repair kit allows you to quickly address the problem and get back on the road, minimizing the disruption to your journey.A tire repair kit isn’t just a “nice-to-have”; it’s a necessity for any road trip, especially if you’re venturing into less populated areas or driving on less-than-perfect roads.
The peace of mind knowing you can handle a flat tire yourself is invaluable. Several types of kits cater to different needs and levels of preparedness.
So, you’re prepping for a killer road trip, right? Best tire repair kits are a total must-have, because, let’s face it, roadside emergencies happen. But if things go really sideways, you might need to check out your insurance coverage; understanding the Nationwide Vanishing Deductible details could save you a ton of cash. Anyway, back to those tire kits – grab one with a good compressor and sealant, and you’ll be golden.
Types of Tire Repair Kits
Tire repair kits range from simple plug kits for minor punctures to more comprehensive kits that include air compressors and sealant. Understanding the differences between these options helps you choose the best kit for your needs and driving style. A basic plug kit is sufficient for small punctures, easily repaired with a tire plug inserted into the hole.
Patch kits offer a more permanent repair, involving patching the inside of the tire after removing the puncture. Compressor kits, often paired with sealant, inflate the tire, allowing you to drive to a repair shop. More advanced kits may include tire pressure gauges, gloves, and other helpful tools.
Essential Components of a Typical Tire Repair Kit
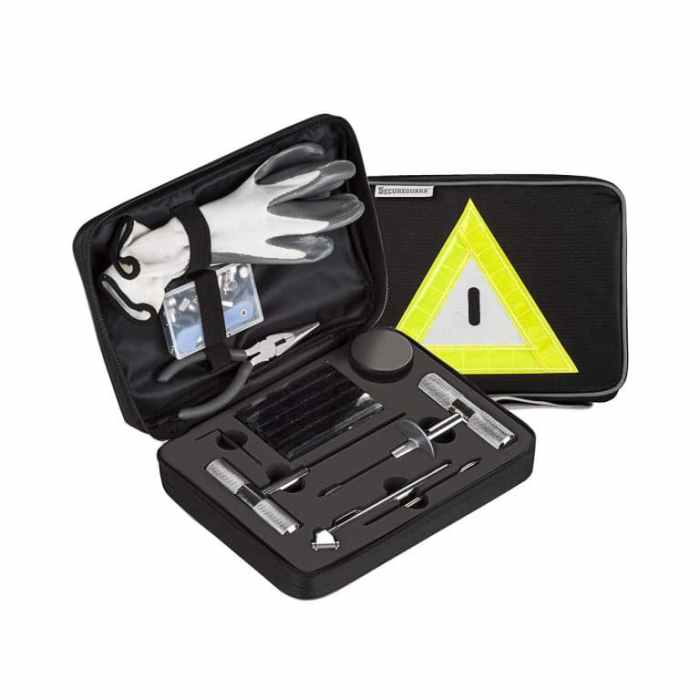
A well-equipped tire repair kit typically includes several essential components. These usually include tire plugs or patches (depending on the kit type), a plug insertion tool, a rasp or reamer to clean the puncture hole, a tire sealant (often in aerosol form), a valve core removal tool, and instructions for use. Some kits may also include an air compressor, a gauge to check tire pressure, and a pair of work gloves.
The quality and durability of these components can vary significantly between different brands and price points, so it’s worth investing in a reputable kit with high-quality materials for reliable performance. Consider a kit that includes a carrying case for convenient storage and transport. A good kit ensures you have everything you need in one place, readily accessible in case of an emergency.
Features to Consider When Choosing a Tire Repair Kit
Picking the right tire repair kit for your road trip is crucial; a flat tire far from civilization can quickly turn a fun adventure into a major headache. The best kit will depend on your vehicle, your driving habits, and your comfort level with DIY repairs. Let’s break down the key features to consider.Choosing a tire repair kit involves evaluating several critical aspects to ensure you’re prepared for unexpected flat tires on the road.
The right kit will depend on factors such as the size and type of your vehicle, your mechanical aptitude, and the types of roads you anticipate driving on. A comprehensive approach to selection will significantly increase your chances of a successful on-the-spot repair.
Ease of Use and Durability
Ease of use is paramount, especially in stressful roadside situations. Some kits are designed with intuitive tools and clear instructions, while others might require more mechanical skill. Look for kits with clearly labeled components and easy-to-follow instructions, ideally with pictures. Durability is equally important; you need a kit that can withstand the rigors of being stored in a vehicle for extended periods and potentially be used in less-than-ideal conditions.
A sturdy carrying case is a must, protecting the components from damage and keeping them organized. Consider the materials used in the construction of the tools; high-quality steel or durable plastics will ensure longevity. For example, a kit with a well-designed puncture locator tool made from hardened steel will be significantly more durable and reliable than one made from softer metal that could bend or break easily.
Sealant and Repair Plug Types
Tire repair kits typically employ either a liquid sealant, repair plugs, or a combination of both. Liquid sealants are convenient; they’re simply injected into the tire, sealing the puncture from the inside. However, they may not be effective for larger punctures or those involving significant sidewall damage. They also require a period of time for the sealant to set, making it crucial to ensure you are safely parked.
Repair plugs, on the other hand, are inserted into the puncture hole after it’s been cleaned and prepared. They offer a more permanent solution for smaller punctures, but require more manual dexterity. A combination kit offers the best of both worlds, providing options for different scenarios. For example, a small puncture might be effectively sealed with a plug, while a larger puncture might require the sealant for initial stabilization before the plug is inserted.
Choosing a kit with both a high-quality sealant and durable plugs ensures greater versatility and a higher likelihood of success.
Vehicle Size and Type
The size and type of your vehicle directly impact your tire repair kit selection. Larger vehicles, such as trucks and SUVs, typically require kits designed to handle larger tires and potentially more substantial punctures. Kits specifically designed for cars might be insufficient. Consider the tire size and type when selecting a kit, ensuring it’s compatible with your vehicle’s tires.
For example, a kit designed for standard passenger car tires might not have the necessary length or diameter of plugs for larger truck tires. Additionally, the type of terrain you frequently drive on should also be considered. Off-road vehicles might benefit from a more robust kit with added features like a tire pressure gauge or a more powerful compressor for quick inflation.
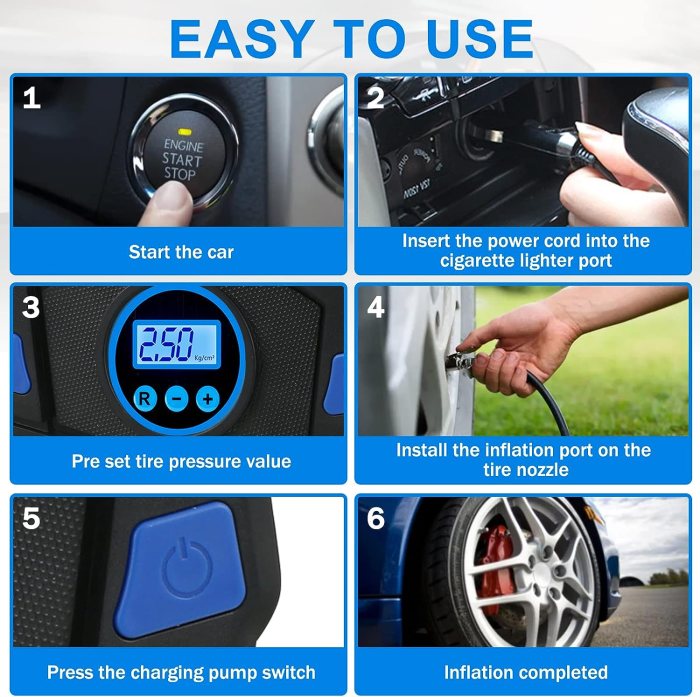
How to Use a Tire Repair Kit
So, you’ve got a flat. Don’t panic! With the right tire repair kit and a little know-how, you can often get back on the road quickly. This guide will walk you through the process, step-by-step, making even the most daunting flat tire seem manageable. Remember, safety first! Always prioritize your personal safety and the safety of others when working on a roadside repair.
Tire Repair Kit Usage: A Step-by-Step Guide
This section provides a detailed, step-by-step guide to using a typical tire repair kit. Remember that specific instructions may vary slightly depending on your kit’s components. Always refer to your kit’s included instructions as well.
So, you’re planning a rad road trip and need a killer tire repair kit – because, let’s be real, flats happen. But what if your ride’s actually a lease you’re trying to ditch? If you’re stressing about early termination fees, check out this guide on How to get out of a car lease early before you hit the road.
Then, grab that tire kit and get ready for adventure!
| Image | Step Number | Action | Important Note |
|---|---|---|---|
| Imagine a picture of a car safely pulled over to the side of the road, hazard lights flashing. The driver is assessing the flat tire. | 1 | Assess the Situation: Pull over to a safe location, engage your parking brake, and turn on your hazard lights. Check the tire for embedded objects (like nails or screws) and the extent of the damage. If the sidewall is damaged, you’ll need professional help. | Safety first! Never attempt repairs on a busy road. Ensure a stable and level surface. |
| Imagine a close-up image showing the tire’s valve stem, with a pressure gauge attached, indicating low pressure. | 2 | Check Tire Pressure: Use a pressure gauge to determine how much air is remaining in the tire. This helps you assess the severity of the puncture. | A completely flat tire will require more effort to repair than a slightly deflated one. |
| Imagine an image showing the removal of a valve core removal tool from the valve stem, and a small amount of air escaping. | 3 | Deflate the Tire Completely: Use a valve core removal tool to fully deflate the tire. This makes it easier to insert the repair plug or patch. | This step is crucial for effective repair. A partially inflated tire makes insertion difficult. |
| Imagine a picture of the tire puncture being cleaned with a rasp or reamer. | 4 | Clean the Puncture: Use the rasp or reamer (included in most kits) to clean and slightly enlarge the puncture hole. This removes any debris and creates a better seal for the plug. | Avoid enlarging the hole excessively; just enough to create a clean, slightly tapered opening. |
| Imagine an image showing a tire plug being inserted into the puncture using a special tool. | 5 | Insert the Plug: Coat the plug with the adhesive provided in your kit. Use the insertion tool to carefully push the plug into the hole from the inside of the tire. | Ensure the plug is fully inserted to create a strong seal. |
| Imagine a picture of the excess plug being trimmed flush with the tire’s surface. | 6 | Trim the Plug: Once the plug is inserted, carefully trim any excess protruding from the tire surface using a sharp knife or scissors. | A flush trim ensures even tire pressure and prevents damage. |
| Imagine a picture of an air compressor being used to inflate the tire. | 7 | Inflate the Tire: Use an air compressor or a portable inflator to inflate the tire to the recommended pressure (found on the tire sidewall or your owner’s manual). | Don’t overinflate! Overinflation can damage the tire. |
| Imagine a picture of the driver checking the tire pressure with a gauge after inflation. | 8 | Check the Pressure Again: After inflating, double-check the pressure with your gauge and adjust as needed. | Ensure the tire is properly inflated for safe driving. |
| Imagine a picture of the car driving away safely. | 9 | Drive Carefully: After the repair, drive slowly and cautiously for a short distance. Monitor the tire pressure regularly. | Get the tire professionally inspected as soon as possible. A temporary repair is not a permanent solution. |
Different Types of Tire Damage and Repair Kit Suitability
Choosing the right tire repair kit hinges on understanding what kind of damage you’re dealing with. Not all tire problems are created equal, and some are simply beyond the scope of a DIY repair. Knowing your limitations is crucial for safety and avoiding costly mistakes. This section clarifies which tire issues are suitable for at-home repair and which necessitate professional intervention.Tire repair kits are generally designed for punctures and small cuts in the tire tread.
These are usually caused by small objects like nails, screws, or bits of glass that penetrate the tire’s surface. A successful repair typically involves plugging the hole from the inside of the tire, sealing the puncture and restoring air pressure. However, there are limitations to what even the best kit can handle.
Punctures and Small Cuts Suitable for Repair Kits
Small punctures and cuts confined to the tread area, and not exceeding a certain size (typically less than ¼ inch), are often successfully repaired with a quality tire repair kit. The kit’s plugs seal the hole, preventing further air loss. For example, if you hit a small nail while driving on a highway and the resulting puncture is small and in the tread, a repair kit is a viable option, especially if you are far from a tire shop.
However, it’s crucial to inspect the puncture thoroughly before attempting a repair. If the puncture is jagged or irregular, it might be better to seek professional help.
Tire Damage Requiring Professional Repair or Replacement
Many types of tire damage are beyond the capabilities of a standard tire repair kit. These require the expertise of a professional tire technician who has the tools and knowledge to assess the damage correctly and perform a safe and lasting repair or replacement.
Examples of Situations Requiring Professional Help, Best tire repair kits for road trips
- Large Punctures: Holes larger than ¼ inch in diameter, or those with irregular edges, are generally too large for a simple plug repair. The structural integrity of the tire may be compromised, necessitating a patch or tire replacement.
- Sidewall Damage: Any damage to the sidewall of the tire, even a small cut or puncture, usually requires replacement. The sidewall is a crucial part of the tire’s structure, and damage here compromises its ability to maintain air pressure and support the vehicle’s weight. Driving on a tire with sidewall damage is extremely dangerous.
- Significant Tread Wear: While a tire repair kit can fix a puncture in a worn tire, significant tread wear reduces the tire’s overall lifespan and grip. Driving on severely worn tires is risky and illegal in many areas. A worn tire is more susceptible to punctures and blowouts, even if the puncture is small.
- Internal Damage: A puncture may cause internal damage to the tire’s belts or casing, which isn’t visible from the outside. Only a professional can diagnose this type of damage.
- Bead Damage: Damage to the tire bead (the part that sits on the wheel rim) prevents proper seating and inflation. This necessitates professional repair or replacement.
Top-Rated Tire Repair Kits: Best Tire Repair Kits For Road Trips
Choosing the right tire repair kit can be a game-changer on a road trip. A poorly chosen kit can leave you stranded, while a good one can get you back on the road quickly and safely. This comparison focuses on several highly-rated kits, highlighting their strengths and weaknesses to help you make an informed decision.
Top-Rated Tire Repair Kit Comparison
This table compares three highly-rated tire repair kits, considering their features, advantages, and disadvantages. Remember that individual needs and preferences will influence the best choice for you.
| Kit Name | Key Features | Pros | Cons |
|---|---|---|---|
| Slime 70004 Complete Flat Repair Kit | Includes sealant, inflator, and durable carrying case; designed for tubeless tires; easy-to-use instructions. | Easy application, effective sealant, compact and portable, relatively inexpensive. | Sealant can be messy, may not work on large punctures, not suitable for all tire types. |
| Fix-a-Flat 10001 Complete Tire Repair Kit | Contains a high-pressure inflator, sealant, and instructions; suitable for passenger car tires; convenient all-in-one design. | Quick inflation, simple to use, readily available at most auto parts stores. | May not be as effective for larger punctures, sealant may clog valve, limited lifespan of the inflator. |
| 3M 00051 Automotive Tire Repair Kit | Features a professional-grade sealant, plugs, and reamer; designed for more extensive repairs; includes detailed instructions. | Effective for larger punctures, durable plugs provide a long-lasting repair, suitable for multiple repairs. | More complex to use than other kits, requires more time and effort, higher initial cost. |
The information above demonstrates how to make an informed decision. Consider the size and type of punctures you anticipate encountering. If you mostly deal with small punctures and prioritize ease of use and cost-effectiveness, a kit like the Slime 70004 might be ideal. If you need a quick, temporary fix, the Fix-a-Flat 10001 might suffice. For more significant punctures or multiple repairs, the 3M 00051 kit offers more robust capabilities, but at a higher cost and with increased complexity.
Ultimately, the best kit depends on your specific needs and driving conditions.
Safety Precautions and Best Practices

Using a tire repair kit can be a lifesaver on a road trip, but safety should always be your top priority. Failing to take proper precautions can lead to injury or even make the situation worse. Remember, you’re working with sharp objects, pressurized air, and potentially hazardous chemicals. Always prioritize your well-being and follow these guidelines for a safe and successful repair.Proper safety measures minimize risks associated with tire repair.
This includes protecting yourself from potential hazards like punctures, chemical exposure, and eye injuries. Safe disposal of used materials is equally important for environmental responsibility and preventing accidental exposure. Finally, maintaining your kit ensures it’s ready when you need it.
Personal Protective Equipment (PPE)
Before you even begin, gather your personal protective equipment (PPE). This should always include sturdy work gloves to protect your hands from sharp objects and potential chemical exposure. Safety glasses or a face shield are crucial to prevent eye injuries from flying debris or accidental chemical splashes. Consider using a respirator if working in a poorly ventilated area, especially if using sealant that has strong fumes.
Remember, these are not optional; they’re essential for your safety.
Proper Disposal of Used Materials
Used tire sealant and patching materials should never be thrown in the trash or down the drain. Check your local regulations for proper disposal methods. Many communities have hazardous waste collection centers that accept these materials. Alternatively, some auto parts stores may accept used tire repair materials for recycling or proper disposal. Always read the product labels for specific disposal instructions.
Improper disposal can contaminate soil and water, harming the environment.
Tire Repair Kit Maintenance
Regular maintenance is key to ensuring your tire repair kit is ready for action. After each use, clean all components thoroughly. Remove any excess sealant or adhesive, and let everything dry completely before storing it. Inspect the sealant canister for any leaks or damage. Replace any worn or damaged tools, such as the reamer or plugger.
Store your kit in a cool, dry place, away from direct sunlight and extreme temperatures. Consider creating a checklist to ensure you regularly inspect and maintain your kit. A well-maintained kit will give you peace of mind knowing you’re prepared for unexpected tire problems.
Beyond the Repair Kit
Okay, so you’ve got your awesome tire repair kit – high five! But a flat tire is just one of many potential road trip woes. Being prepared for a wider range of emergencies will make your journey smoother and safer, turning potential headaches into minor inconveniences. Think of it as building a safety net for your adventure.A comprehensive emergency kit goes beyond just fixing a puncture.
It’s about having the right tools and supplies to handle various unexpected situations, minimizing stress and maximizing your ability to get back on the road quickly and safely. Proper preparedness can mean the difference between a minor delay and a major disruption to your travel plans.
Roadside Assistance Plan
Having a roadside assistance plan is like having an emergency safety net. It’s an invaluable resource, providing access to professional help when you need it most. These plans typically cover services like towing, tire changes (even if you have a repair kit), jump starts, lockout assistance, and fuel delivery. Consider the coverage area and the types of services offered when choosing a plan; some plans even include trip interruption benefits.
For example, AAA is a well-known provider with extensive coverage, but many auto insurance companies also offer roadside assistance as part of their policies. Knowing you have a reliable backup plan can significantly reduce anxiety while on the road.
Essential Items for a Comprehensive Road Trip Emergency Kit
Before you hit the road, gather these essentials: A well-stocked kit can transform a stressful situation into a manageable one. Think of it as your personal roadside rescue squad in a box.
- Jumper Cables: A dead battery is a common roadside problem. Good quality jumper cables are essential for getting your car started again.
- First-Aid Kit: A comprehensive kit should include bandages, antiseptic wipes, pain relievers, and any personal medications. Consider adding items specific to your needs and the length of your trip.
- Flashlight (with extra batteries): Essential for visibility at night or in low-light conditions, whether you’re changing a tire or dealing with another issue.
- Basic Tool Kit: Include screwdrivers, pliers, wrenches – basic tools that might be useful for minor repairs or adjustments.
- Reflective Triangles or Flares: To warn other drivers of your vehicle’s location in case of a breakdown, especially in low-visibility situations.
- Gloves: Protect your hands while working on your vehicle or dealing with potentially messy situations.
- Duct Tape and Zip Ties: Incredibly versatile for quick fixes and securing loose items.
- Water and Non-Perishable Snacks: In case you’re stranded for a while.
- Blankets or Warm Clothing: For unexpected delays or cold weather.
- Cell Phone Charger: Keep your phone powered up for communication.
- Paper Maps and Directions: A backup in case of GPS failure.
Last Recap
So, there you have it – your crash course in tire repair kits. Being prepared for a flat tire on a road trip is way less stressful than actually
-having* a flat tire on a road trip. Grab a kit, pack it with your other emergency supplies, and hit the road with confidence knowing you’re ready for anything.
Now get out there and explore! Happy travels!