Best ceramic coating kits for DIY 2025? Yeah, that’s a thing now. Giving your ride that showroom shine doesn’t mean breaking the bank or hiring a pro anymore. This year’s crop of DIY ceramic coating kits are seriously impressive, offering incredible durability and ease of use. We’re diving deep into the top contenders, comparing features, prices, and user reviews to help you find the perfect kit for your next detailing project.
Get ready to geek out on gloss!
From the evolution of ceramic coatings to the nitty-gritty details of application and maintenance, we’ve got you covered. We’ll break down the pros and cons of each kit, walk you through the application process step-by-step, and even tackle some common DIY pitfalls. By the end, you’ll be confident in your ability to achieve a professional-level finish – all from the comfort of your own garage (or driveway!).
Introduction to DIY Ceramic Coating Kits

Ceramic coating is a game-changer for car enthusiasts looking to protect their vehicles’ paint and enhance their shine. It’s a liquid polymer that, when applied correctly, bonds to the clear coat, creating a durable, hydrophobic layer resistant to scratches, UV damage, and environmental contaminants like bird droppings and industrial fallout. The result is a glossy, easy-to-clean surface that looks amazing and lasts for years.The appeal of DIY ceramic coating kits lies in their affordability and accessibility compared to professional detailing services, which can cost hundreds, even thousands of dollars.
While professional application guarantees a flawless finish, DIY kits empower car owners to achieve excellent results at a fraction of the price. The hands-on experience also provides a sense of accomplishment and allows for greater control over the process.
A Brief History of DIY Ceramic Coatings
Initially, ceramic coatings were primarily a professional service, used by detailers and dealerships for high-end vehicles. The process was complex and required specialized equipment and training. However, over the past decade, the market has seen a surge in the availability of DIY ceramic coating kits. This democratization is largely due to advancements in the formulation of the coating materials, making them easier to apply and less sensitive to minor imperfections in application technique.
So, you’re looking at the best ceramic coating kits for DIY in 2025? That’s awesome! Getting that perfect shine is half the battle, but don’t forget the interior; check out this guide for Best car air fresheners under $15 to make your ride smell amazing after you’ve finished detailing. Then, once your car is sparkling clean inside and out, you’ll truly appreciate that new ceramic coating.
Early DIY kits were often difficult to work with, requiring considerable skill and often yielding inconsistent results. Modern kits, however, include improved instructions, better application tools, and formulations designed for ease of use, even for novice detailers. The rise of online detailing communities and tutorial videos has also contributed significantly to the growth and refinement of DIY ceramic coating techniques.
Top 5 Ceramic Coating Kits for DIY in 2025
Choosing the right DIY ceramic coating kit can be overwhelming, given the sheer number of options available. This selection focuses on five kits anticipated to be popular and effective choices for the average DIY enthusiast in 2025, balancing ease of use with performance and cost-effectiveness. We’ve considered user reviews and projected market trends to compile this list. Remember that individual results may vary depending on your vehicle’s condition and application technique.
Top 5 Ceramic Coating Kits Compared
| Kit Name | Key Features | Price Range | User Reviews Summary |
|---|---|---|---|
| CarPro CQuartz UK 3.0 Kit | Exceptional durability (2-3 years), relatively easy application, high gloss, hydrophobic properties. | $150 – $200 | Positive: Excellent results, long-lasting protection. Negative: Can be slightly more challenging for beginners, higher price point. |
| Chemical Guys HydroSlick Ceramic Coating Kit | Good durability (1-2 years), user-friendly application, decent gloss, strong hydrophobic properties. Includes multiple applicators and prep materials. | $80 – $120 | Positive: Easy to use, good value for money. Negative: Durability may not match higher-end options. |
| Gtechniq Crystal Serum Light Kit | Excellent durability (2-3 years), requires more precision in application, exceptional gloss and hydrophobic properties. | $180 – $250 | Positive: Amazing shine and protection. Negative: Steeper learning curve, more expensive than some alternatives. |
| Adam’s Polishes Graphene Ceramic Coating Kit | Good durability (1.5-2 years), easy application, moderate gloss, decent hydrophobic properties. Complete kit with all necessary tools. | $100 – $150 | Positive: Simple application, good results for the price. Negative: Durability might not be as long-lasting as premium options. |
| Turtle Wax Hybrid Solutions Ceramic Spray Coating | Shorter durability (6-12 months), extremely easy spray-on application, decent gloss, good value for a quick detailer. | $20 – $40 | Positive: Very easy to use, affordable. Negative: Not as durable as other options; more frequent reapplication required. |
Application Process and Techniques: Best Ceramic Coating Kits For DIY 2025
Applying a ceramic coating might seem daunting, but with the right preparation and technique, you can achieve professional-looking results at home. This section details the step-by-step process, essential tools, and various application methods to help you get the best finish. Remember, careful preparation is key to a long-lasting, flawless coat.Successfully applying a DIY ceramic coating involves a methodical approach, from meticulous surface prep to careful application and adequate curing.
Each step plays a crucial role in the final outcome, impacting both the aesthetic appeal and the protective capabilities of the coating. Following these instructions closely will maximize your chances of success.
Surface Preparation
Thorough surface preparation is paramount for optimal ceramic coating adhesion and longevity. This involves several critical steps designed to remove contaminants and ensure a perfectly smooth surface. Neglecting this stage can lead to poor bonding, uneven application, and a shorter lifespan for your ceramic coating. The process generally includes washing, decontaminating, and polishing.
- Washing: Begin with a thorough wash using a high-quality car wash soap and plenty of water. Use two buckets – one for soapy water and one for rinsing – to prevent recontamination. Pay close attention to crevices and hard-to-reach areas.
- Decontamination: This step removes embedded contaminants like iron particles, tar, and tree sap that washing alone can’t remove. Use a dedicated iron remover and tar remover, following the manufacturer’s instructions carefully. A clay bar can also be used to further refine the surface.
- Polishing (Optional): If your paint has imperfections like swirl marks or light scratches, a polishing step is highly recommended. This will create a perfectly smooth surface for optimal coating adhesion and a glossy finish. Use a polishing compound and a dual-action polisher for best results. Avoid using a rotary polisher unless you have experience, as it can easily burn through the clear coat.
Application Methods and Tools
Choosing the right application method and tools will significantly influence the ease and effectiveness of the process. Different techniques offer various advantages and disadvantages, so selecting the one that best suits your skill level and the size of your project is crucial.
- Applicators: These are commonly used for applying ceramic coatings. Microfiber applicators are popular due to their softness and ability to distribute the coating evenly. They’re great for smaller areas and intricate details but can be time-consuming for larger vehicles.
- Spray Bottles: Spray bottles allow for quick and even application over larger surfaces. However, they require more precise control to avoid over-application and potential streaking. It’s essential to practice your technique beforehand.
Essential Tools and Materials
Gathering the necessary tools and materials beforehand will streamline the application process and ensure a smooth, efficient workflow. Having everything readily available will prevent interruptions and minimize the chances of mistakes.
- Ceramic Coating Kit: The chosen ceramic coating kit, including the coating itself, any required prep solutions (e.g., degreaser, iron remover), and applicators.
- Microfiber Towels: High-quality microfiber towels are essential for both cleaning and wiping off excess coating. Have plenty on hand to avoid using dirty towels, which can contaminate the coating.
- Spray Bottles (Optional): If using a spray application method.
- Microfiber Applicators: For applying the coating directly.
- Bucket(s): For washing and rinsing.
- Wash Mitt(s): For washing the vehicle.
- Car Wash Soap: A high-quality car wash soap specifically designed for use with ceramic coatings.
- Iron Remover and Tar Remover: For decontaminating the paint.
- Clay Bar (Optional): For further paint decontamination.
- Polisher and Polishing Compound (Optional): For polishing the paint before application.
- Gloves: To protect your hands from the chemicals.
- Masking Tape (Optional): To protect trim, rubber, and plastic components.
Curing Time and Aftercare
The curing time for a ceramic coating varies depending on the specific product and environmental conditions. Proper curing is crucial for the coating to fully harden and achieve its optimal protective properties. The manufacturer’s instructions should always be followed meticulously. After the curing period, proper aftercare will help maintain the coating’s longevity and performance.
Maintenance and Longevity
So, you’ve painstakingly applied your DIY ceramic coating. Now what? Proper maintenance is key to extending the life and shine of your hard work. Neglecting this crucial step will significantly shorten the lifespan of your coating and diminish its protective qualities. Think of it like this: a ceramic coating is an investment in your car’s finish, and regular maintenance is the insurance policy.Proper maintenance ensures your ceramic coating continues to repel water, dirt, and other contaminants, maintaining that showroom shine and protecting your paint from the elements.
This involves a combination of careful washing techniques and the use of appropriate cleaning products. Ignoring this can lead to premature degradation of the coating, requiring earlier reapplication and potentially costing you more in the long run.
Recommended Cleaning Products
Choosing the right cleaning products is crucial for maintaining your ceramic coating. Harsh chemicals or abrasive cleaners can strip away the protective layer, defeating the purpose of the coating. Opt for pH-neutral car washes specifically designed for use with ceramic coatings. These formulas are less likely to damage the coating and will effectively remove dirt and grime without compromising its integrity.
Avoid using dish soap or other household cleaners, as these can be too harsh. Additionally, a dedicated ceramic coating-safe wheel cleaner is a smart investment to keep those rims pristine without harming the coating that might extend onto them. Consider using a quick detailer spray between washes to remove light dust and dirt, maintaining that glossy finish.
Washing Techniques
The
- way* you wash your car is just as important as
- what* you wash it with. Always start by rinsing the vehicle thoroughly to remove loose dirt and debris. This prevents scratching the surface during the washing process. Use the two-bucket method – one bucket with wash solution and one with clean water for rinsing your wash mitt. This prevents recontamination and reduces the risk of scratching.
Wash in straight lines from top to bottom, using a soft wash mitt or sponge to avoid swirl marks. Finally, thoroughly rinse the vehicle again to remove all traces of soap. Drying is also critical; use a high-quality microfiber drying towel to prevent water spots, which can etch into the clear coat over time. Avoid using abrasive materials like terry cloth towels.
Factors Affecting Coating Lifespan
Several factors can impact the longevity of a ceramic coating. Environmental conditions play a significant role. For example, cars frequently exposed to harsh weather conditions like extreme heat, freezing temperatures, and heavy UV radiation will see their coatings degrade more quickly than those kept in a garage. Similarly, frequent washing, while important for maintenance, can also contribute to the gradual erosion of the coating.
The type of ceramic coating itself also influences its lifespan; some high-end coatings are engineered to last longer than budget-friendly options. Finally, the initial application process is crucial; a poorly applied coating will not last as long as one applied correctly, highlighting the importance of careful preparation and application techniques. For instance, a coating applied to a poorly prepped surface, riddled with swirls and scratches, will not perform optimally and may not last as long.
Cost Comparison and Value Analysis
Choosing between a DIY ceramic coating kit and professional application involves careful consideration of cost and long-term value. While the initial investment for a DIY kit is significantly lower, the total cost and the overall outcome need to be weighed against professional services. This analysis compares the two options to help you make an informed decision.
DIY Ceramic Coating Kit Costs Versus Professional Application
The cost of a DIY ceramic coating kit typically ranges from $50 to $300, depending on the brand, size, and included components. This cost covers the materials needed for application. Professional application, on the other hand, can range from $500 to upwards of $1500, depending on the vehicle’s size and the type of ceramic coating used. This price includes both materials and labor.
Labor costs represent a substantial portion of the professional service cost.
Cost Breakdown and Value Proposition
The following table provides a simplified cost comparison:
| Option | Materials Cost | Labor Cost | Total Cost | Value Proposition |
|---|---|---|---|---|
| DIY Kit (Budget) | $50 – $100 | $0 | $50 – $100 | High value for budget-conscious individuals willing to invest time and effort. Results may vary based on skill level. |
| DIY Kit (Premium) | $150 – $300 | $0 | $150 – $300 | Good value for those seeking higher-quality results and willing to dedicate time to the application process. |
| Professional Application (Basic) | (Included in service cost) | $500 – $800 | $500 – $800 | Offers convenience and guaranteed professional results; ideal for individuals prioritizing time and ease of application. |
| Professional Application (Premium) | (Included in service cost) | $800 – $1500+ | $800 – $1500+ | Highest quality materials and expert application; suitable for high-end vehicles or individuals prioritizing the best possible protection and finish. |
Note: These are estimated ranges, and actual costs may vary depending on location, vehicle size, and specific products or services.
Maximizing DIY Kit Value and Longevity
Proper preparation is key to maximizing the value and longevity of a DIY ceramic coating kit. This includes thoroughly cleaning and decontaminating the vehicle’s surface before application. Following the manufacturer’s instructions meticulously is also crucial for achieving optimal results and extending the coating’s lifespan. Regular maintenance, such as washing with pH-neutral car wash soap and using a quick detailer spray, will help maintain the coating’s hydrophobic properties and overall shine.
Avoiding harsh chemicals and abrasive materials is essential to prevent premature degradation of the ceramic coating. Investing in quality microfiber towels and applicators will also contribute to a professional-looking finish and prevent potential scratches. By following these tips, you can significantly extend the life of your ceramic coating and get the most out of your DIY investment.
Troubleshooting Common Issues
So, you’ve tackled your DIY ceramic coating project, but things didn’t go exactly as planned? Don’t worry, it happens! Even experienced detailers run into snags. This section will cover some common problems you might encounter and offer solutions to get you back on track to a gleaming, protected finish. We’ll cover everything from unsightly streaking to uneven application and curing issues.Even with careful preparation and meticulous application, several issues can arise during the DIY ceramic coating process.
So, you’re looking at the best ceramic coating kits for DIY in 2025? That’s awesome! After you’ve got your ride gleaming, you might want to upgrade the lighting; check out these LED headlight bulbs for Honda Civic 2025 if you’ve got one. Seriously though, back to those ceramic coatings – getting that perfect shine is key, and a good kit can make all the difference.
These issues are often easily remedied with a little knowledge and the right approach. Understanding the root causes and applying appropriate solutions is crucial for achieving a professional-looking and long-lasting ceramic coating.
Streaking and Uneven Coating, Best ceramic coating kits for DIY 2025
Streaking and unevenness are often caused by improper application techniques, such as using too much product, applying it unevenly, or not buffing thoroughly. Insufficient cleaning and preparation of the surface before application can also contribute to these problems. To prevent streaking, ensure the surface is perfectly clean and dry before applying the coating. Use a microfiber applicator pad to apply thin, even coats, working in small sections.
Overlapping sections slightly ensures even coverage. Always follow the manufacturer’s instructions regarding application time and buffing. If streaking still occurs, try using a high-quality detailing spray to help remove excess product and achieve a smoother finish. In severe cases, you may need to carefully remove the coating and reapply.
Improper Curing
Improper curing, meaning the coating doesn’t properly harden, can result from environmental factors such as high humidity, low temperatures, or direct sunlight during the curing process. This can lead to a weak, easily marrable coating. To prevent this, follow the manufacturer’s instructions carefully regarding curing time and environmental conditions. Ideally, apply the coating in a cool, dry, shaded area, away from direct sunlight and moisture.
Avoid washing or exposing the vehicle to rain for the specified curing period. If the coating doesn’t cure properly, you may need to gently remove the affected areas and reapply, ensuring the proper curing environment is maintained.
Insufficient Protection or Durability
Sometimes, despite following all instructions, the coating may not offer the expected level of protection or durability. This might be due to using a low-quality kit, improper surface preparation, or environmental factors. To ensure sufficient protection and durability, always choose high-quality ceramic coating kits from reputable brands. Meticulous surface preparation, including thorough washing, clay barring, and panel wiping, is crucial.
Environmental factors like UV exposure and harsh weather conditions can also affect longevity. Regular maintenance, such as washing with pH-neutral car wash soap and applying a quick detailer, will extend the life of your ceramic coating.
Frequently Asked Questions
Understanding common concerns is vital for successful DIY ceramic coating. The following addresses some frequently asked questions.
- Q: Can I apply ceramic coating in direct sunlight?
A: No, direct sunlight can cause the coating to cure too quickly, leading to an uneven finish and reduced durability. Apply in a shaded area. - Q: How long does a ceramic coating last?
A: The longevity of a ceramic coating depends on the quality of the product, application, and maintenance. It can typically last anywhere from 12 to 36 months. - Q: What should I do if I get runs or drips?
A: Quickly wipe away runs or drips with a clean microfiber towel before the coating cures. For larger issues, carefully remove the coating and reapply. - Q: Can I use a pressure washer after applying ceramic coating?
A: Wait until the coating is fully cured before using a pressure washer. High pressure can damage a prematurely cured coating. - Q: What is the best way to clean a car with a ceramic coating?
A: Use a pH-neutral car wash soap and a wash mitt. Avoid harsh chemicals and abrasive materials.
Visual Guide to Application (Describe detailed images, NOT links)
A picture is worth a thousand words, especially when it comes to mastering the art of ceramic coating application. These detailed image descriptions will guide you through the process, from achieving a flawless finish to understanding how to maintain your newly coated car.
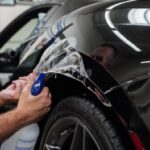
Correct Application Technique
Imagine a close-up image of a hand holding a ceramic coating applicator pad. The applicator is lightly gliding across a freshly prepped section of a car’s hood, moving in slow, overlapping strokes. The pressure applied is gentle, almost feather-light; you shouldn’t be able to feel significant resistance. The applicator pad itself is evenly saturated with coating, showing no visible dry spots or excessive pooling.
The surrounding area is meticulously clean, highlighting the importance of preparation. The image emphasizes the smooth, even distribution of the coating, demonstrating the importance of consistent, controlled movements. This technique ensures full coverage and prevents streaking or uneven thickness.
Comparison of Proper and Improper Application
This image is a split-screen comparison. On the left, a section of a car’s bumper showcases a perfectly applied ceramic coating. The surface is uniformly glossy, with a deep, wet-looking shine. There are no visible streaks, runs, or imperfections. The color is consistent and vibrant.
The right side of the image shows a poorly applied coating. Streaks are clearly visible, the shine is uneven, and some areas appear dull or hazy. There might even be visible drips or runs of the coating. This side highlights the negative impact of uneven application and insufficient spreading. The difference in clarity and overall appearance is striking, emphasizing the importance of technique.
Cleaning and Maintenance of a Ceramic Coated Surface
This image depicts the proper cleaning of a ceramic coated vehicle. A person is gently washing the car using a soft wash mitt and a specialized car wash soap designed for ceramic coatings. The water is sheeting off the surface, demonstrating the hydrophobic properties of the coating. The image shows no aggressive scrubbing or use of harsh chemicals. The background emphasizes the overall cleanliness and condition of the car, suggesting the long-term benefits of proper maintenance.
Additionally, a separate small inset shows the use of a quick detailer spray to remove light dust and contaminants, maintaining the glossy finish between washes. This demonstrates the ease of maintenance and the long-term protection offered by a ceramic coating.
Conclusion

So, there you have it – your ultimate guide to DIY ceramic coating in 2025! Whether you’re a seasoned detailer or a complete newbie, we hope this deep dive into the best kits on the market has empowered you to take on this rewarding project. Remember, a little patience and attention to detail go a long way. With the right kit and a bit of elbow grease, you’ll be rocking that mirror-like shine and bragging rights for months to come.
Happy detailing!