How to install a snorkel on a Toyota Tacoma? It sounds intimidating, right? But with the right tools and a little patience, you can dramatically improve your Tacoma’s off-road capabilities. This guide breaks down the entire process, from choosing the right snorkel to performing post-installation checks, ensuring you’re ready to tackle any terrain. We’ll cover everything from different snorkel types and compatibility to troubleshooting potential problems.
Get ready to breathe easier (literally!) with your upgraded Tacoma.
This comprehensive guide covers selecting the appropriate snorkel for your Tacoma model and year, gathering the necessary tools and materials, and walking you through a step-by-step installation process. We’ll also address common challenges, offer solutions to potential problems, and provide a maintenance schedule to keep your snorkel functioning at its peak. By the end, you’ll be confident in your ability to install a snorkel and hit the trails with confidence.
Understanding Snorkel Types and Compatibility

Choosing the right snorkel for your Toyota Tacoma is crucial for both performance and safety. A poorly chosen snorkel can restrict airflow, reduce engine performance, or even fail during off-road adventures. This section will guide you through the various types of snorkels and help you determine the best fit for your truck.
Snorkel Types and Their Characteristics, How to install a snorkel on a Toyota Tacoma
Several snorkel types cater to different needs and driving styles. Ram-air snorkels are designed to draw in the cleanest possible air from high up, maximizing engine efficiency. These are often preferred for extreme off-roading where dust and water are major concerns. Pre-filter snorkels incorporate a filter element within the snorkel itself, offering an extra layer of protection against dust ingestion.
This is a good choice for frequently dusty environments, potentially extending the life of your air filter. Some snorkels also feature a secondary air intake, allowing for a backup air source in case the primary intake is submerged. Consider your typical driving conditions – extreme off-roading necessitates a robust ram-air snorkel, while milder conditions might permit a less expensive pre-filter option.
Factors Affecting Snorkel Selection for Toyota Tacomas
Several factors influence snorkel compatibility and suitability for your specific Tacoma. The year and model of your Tacoma will determine the available mounting options and the overall dimensions that a snorkel needs to fit. The engine size also plays a role, as larger engines may require snorkels with a greater airflow capacity. Your budget will naturally influence your choice, with prices varying significantly between brands and materials.
Finally, consider the aesthetic appeal; you want a snorkel that complements your truck’s look. It’s wise to consult fitment guides provided by snorkel manufacturers to ensure compatibility before purchasing.
Comparison of Snorkel Brands and Materials
The market offers various snorkel brands, each with its strengths and weaknesses. Popular choices often include brands like Safari Snorkels, ARB, and Airflow. Safari Snorkels are known for their robust construction and high airflow capacity, but they tend to be more expensive. ARB snorkels offer a good balance of performance and price, while Airflow snorkels present a more budget-friendly option.
Materials commonly used include high-density polyethylene (HDPE) for its durability and UV resistance, and ABS plastic, which is lighter but may be less durable in extreme conditions. The choice of material often impacts both the price and the snorkel’s lifespan.
Snorkel Feature Comparison
| Feature | Safari Snorkel | ARB Snorkel | Airflow Snorkel |
|---|---|---|---|
| Material | HDPE | HDPE | ABS Plastic |
| Airflow (cfm) | ~150 (varies by model) | ~120 (varies by model) | ~100 (varies by model) |
| Price (USD) | $500 – $800 | $350 – $600 | $200 – $400 |
| Pre-filter | Optional | Optional | Usually Included |
Necessary Tools and Materials
Installing a snorkel on your Tacoma is a moderately challenging DIY project. Proper tools and materials are crucial for a successful and safe installation, preventing damage to your truck and ensuring a properly functioning snorkel. Failing to have the right equipment can lead to frustration, delays, and potentially a poorly fitted snorkel. This section Artikels the essential tools and materials you’ll need.
Beyond the snorkel kit itself (which should include all the necessary components for the snorkel, like the snorkel tube, mounting hardware, air intake hose, and clamps), you’ll need a range of tools and supplementary materials. The specific tools might vary slightly depending on the snorkel kit’s design and your truck’s year and model, but this list covers the essentials for most installations.
Tools Required for Snorkel Installation
Gathering the right tools beforehand will streamline the installation process significantly. Having everything organized will save you time and prevent interruptions. This list prioritizes tools commonly found in a well-equipped home garage or readily available at most auto parts stores.
- Socket set (metric): A comprehensive set with various sizes will be necessary for removing and installing various bolts and fasteners.
- Wrench set (metric): Both open-end and combination wrenches are useful for accessing hard-to-reach fasteners.
- Screwdrivers (Phillips and flathead): For various screws and fasteners on the truck’s body and the snorkel kit.
- Drill with various drill bits (metal and plastic): For creating pilot holes and potentially enlarging existing holes, depending on the snorkel kit.
- Drill bit size guide: Ensures you select the correct size for different materials.
- Safety Glasses: Essential for eye protection from flying debris and dust.
- Work Gloves: Protect your hands from cuts and scrapes.
- Measuring tape: Crucial for accurate measurements and placement of components.
- Marker: For marking drill locations and other important points.
- Level: Ensures the snorkel is installed straight and level for optimal air intake.
- Silicone sealant: For creating a watertight seal around the snorkel’s mounting points.
- Rags or shop towels: For cleaning surfaces and wiping up spills.
- Jack and jack stands (or ramps): To safely lift your Tacoma and provide access to the fender well.
- Torque wrench: To ensure bolts are tightened to the manufacturer’s specifications, preventing damage to the snorkel or your vehicle.
Additional Materials Beyond the Snorkel Kit
In addition to the tools, you might need these supplementary materials to complete the installation successfully. These items are often overlooked but play a crucial role in ensuring a proper and long-lasting installation.
- Additional silicone sealant: It’s always a good idea to have extra on hand in case of mistakes or unexpected needs.
- Self-tapping screws (if needed): Some snorkel kits might require additional screws for securing certain components.
- Zip ties or cable ties: For neatly bundling wires and hoses.
- Rust preventative spray: To protect any exposed metal surfaces after drilling or cutting.
- Electrical tape: To seal and insulate any electrical connections if modifying wiring.
Pre-Installation Checklist
Before you even begin, a thorough checklist helps ensure a smooth and efficient installation. This preparation phase significantly reduces the likelihood of encountering unexpected problems mid-installation.
- Gather all tools and materials listed above. Verify you have everything before you start.
- Consult your snorkel kit’s instructions thoroughly. Understand each step before proceeding.
- Clean the area around the fender well where the snorkel will be mounted. Remove any dirt, debris, or loose paint.
- Park your Tacoma on a level surface. Ensure the parking brake is engaged.
- Prepare your workspace. Make sure you have adequate lighting and space to work comfortably.
- Take photos of the area before you start. This will be helpful if you need to refer back to the original state of your vehicle.
Step-by-Step Installation Guide: How To Install A Snorkel On A Toyota Tacoma
Installing a snorkel on your Tacoma is a moderately challenging DIY project that requires patience and attention to detail. Proper installation ensures optimal engine protection and performance in challenging off-road conditions. This guide will walk you through each step, focusing on securing a watertight seal and a robust, secure mount.
Mounting the Snorkel to the Air Intake
This step involves carefully aligning and attaching the snorkel’s base to your Tacoma’s existing air intake system. Begin by thoroughly cleaning the area around the factory air intake. This ensures a secure bond with the adhesive and prevents debris from interfering with the seal. Next, precisely position the snorkel base according to the manufacturer’s instructions, ensuring it’s perfectly aligned with the intake.
So you’re looking at how to install a snorkel on your Tacoma? That’s awesome, especially if you plan on some serious off-roading. Remember, though, if you’re towing heavy gear, you’ll need top-notch brakes – check out this guide for the Best brake pads for heavy-duty towing 2025 to make sure you’re safe. Once you’ve got the brakes sorted, you can get back to focusing on that snorkel installation and hitting the trails!
Use the provided hardware to securely fasten the base, tightening bolts gradually and evenly to prevent damage. Remember to consult your specific snorkel kit’s instructions, as variations exist between brands and models. For instance, some kits might require additional modifications to the existing airbox.
Sealing All Connections to Prevent Water Ingress
Preventing water from entering your engine is paramount. After mounting the snorkel base, apply a high-quality automotive sealant to all joints and seams where the snorkel connects to the vehicle’s air intake system. This includes the connection between the snorkel base and the air intake itself, as well as any points where tubing or other components join. A generous application is key; don’t skimp on the sealant.
Allow the sealant to cure completely according to the manufacturer’s instructions before proceeding to the next step. This curing time is crucial for ensuring a waterproof seal; rushing this process can lead to leaks and potential engine damage. For example, a silicone-based sealant often requires 24 hours to fully cure.
Routing the Snorkel Tubing and Securing it to the Vehicle
Properly routing the snorkel tubing is essential for both functionality and aesthetics. Plan the route carefully to avoid sharp bends or kinks that could restrict airflow. Use the provided clamps or zip ties to secure the tubing to the vehicle’s body, ensuring it’s firmly attached but not overly tight. Consider using protective sleeves or wraps where the tubing might rub against the vehicle’s body to prevent abrasion and potential leaks.
For instance, you might route the tubing along the A-pillar and then along the fender well, using appropriate clamps to secure it at intervals.
Attaching the Snorkel Filter and Airbox
The final step involves attaching the snorkel’s pre-filter (if applicable) and the airbox. Carefully install the pre-filter, ensuring it’s correctly positioned and securely fastened. Then, attach the airbox to the snorkel tubing, ensuring a tight seal. Again, use the provided sealant to further enhance the watertight integrity of these connections. Double-check all connections to ensure there are no gaps or loose components.
Remember, a properly sealed airbox is critical to preventing dust and water ingress into the engine. Inspect the filter for proper placement and secure attachment before starting the engine.
Addressing Potential Challenges

Installing a snorkel on your Tacoma isn’t always a walk in the park. While generally straightforward, several potential snags can arise, ranging from minor fitting issues to more significant problems with airflow or leaks. Being prepared for these challenges will save you time, frustration, and potentially some costly repairs. This section Artikels common difficulties, their solutions, and troubleshooting techniques.Fitting issues are probably the most frequent problem.
The snorkel kit might not perfectly align with your truck’s body, requiring some minor adjustments or modifications. Sealant application is another crucial area where problems can arise. Improper sealing can lead to leaks and compromised airflow, impacting engine performance and potentially damaging internal components.
Fitting Issues and Adjustments
Incorrect alignment of the snorkel components is a common hurdle. This often involves the air intake tube not fitting snugly against the body or the mounting brackets not aligning perfectly with existing holes. Solutions typically involve careful measurement and potentially some minor adjustments to the brackets or even the snorkel tube itself. This might include using shims to create a more secure fit or carefully filing down small areas to allow for better alignment.
Remember to always double-check your measurements and ensure a secure fit before permanently fastening any components. For example, if the snorkel’s mounting bracket doesn’t quite line up with a pre-existing hole in the fender, a small amount of careful filing might be necessary to create a perfect fit, ensuring a solid, watertight seal.
So you’re looking at how to install a snorkel on your Tacoma? That’s awesome, serious off-roading requires some serious upgrades. If you’re planning on towing anything heavy, though, you might want to check out the Best diesel trucks for towing 2025 list first – a Tacoma’s not ideal for massive loads. Once you’ve decided on your rig, getting back to that snorkel installation – remember to check your local regulations before you start!
Sealant Application and Leak Troubleshooting
Using the correct sealant and applying it properly is crucial to prevent leaks. Insufficient sealant or incorrect application can result in water entering the air intake, potentially leading to engine damage. If leaks occur, the first step is to carefully inspect all connections and seals. Look for any gaps or cracks where water might be entering. A simple solution might involve reapplying sealant to these areas, ensuring complete coverage.
For more stubborn leaks, you might need to remove and re-install affected components, paying close attention to proper sealant application techniques. Using a high-quality, automotive-grade sealant specifically designed for this purpose is essential. For instance, a leak around the fender mount could be resolved by removing the snorkel, cleaning the surfaces thoroughly, applying a fresh bead of sealant, and then reinstalling the snorkel, allowing sufficient drying time before testing.
Optimizing Snorkel Position and Airflow
The snorkel’s position significantly impacts its performance. If positioned improperly, it might lead to reduced airflow or increased turbulence, negatively affecting engine performance. The optimal position generally involves maximizing the distance from the ground to minimize water ingestion while also ensuring minimal restriction to airflow. Adjustments might involve repositioning the mounting brackets or even slightly modifying the snorkel tube itself.
Testing and observation are key to optimizing snorkel placement. For example, a snorkel positioned too close to the vehicle’s body might create turbulence, leading to reduced engine efficiency. Careful adjustment, possibly involving slightly repositioning the mounting bracket, could improve airflow. Observing the airflow during operation can help determine if further adjustments are necessary.
Post-Installation Checks and Maintenance
So you’ve wrestled that snorkel onto your Tacoma – congrats! But before you hit the trails, thorough post-installation checks are crucial to ensure everything’s working as it should and to prevent future headaches. Neglecting this step could lead to engine damage from water ingestion or compromised airflow. Regular maintenance will keep your snorkel performing optimally for years to come.Proper installation verification involves a few key steps to guarantee your snorkel is sealed, functioning correctly, and won’t become a liability.
These checks aren’t just about safety; they also help you maximize the lifespan and performance of your investment. Let’s get into the specifics of how to make sure your new snorkel is ready for anything.
Snorkel System Leak Test
After completing the installation, a thorough leak test is paramount. This involves carefully inspecting all connections and seals for any gaps or imperfections. Start by using a garden hose, aiming the spray at all joints, clamps, and the snorkel’s air intake. Observe closely for any signs of water leaking into the system. Pay special attention to the area where the snorkel connects to the air intake, as this is a common point of failure.
If you see any leaks, tighten the clamps or reapply sealant as needed. Repeat the test until no leaks are detected. A pressure test, using compressed air, can provide a more thorough seal verification. Apply a small amount of pressure and listen for any escaping air; this will pinpoint even minor leaks.
Airflow Verification
Once you’ve confirmed the absence of leaks, verify that the snorkel is allowing sufficient airflow to the engine. Start the engine and observe the throttle response. A restricted airflow will cause a noticeable decrease in engine performance, potentially accompanied by hesitation or a rough idle. If you notice any performance issues, double-check all connections to ensure there are no blockages or restrictions.
Sometimes, a slightly bent snorkel tube can restrict airflow, so visually inspect the entire system for any bends or kinks.
Snorkel Filter Cleaning and Replacement
The snorkel filter is your engine’s first line of defense against dust, debris, and water. Regular cleaning or replacement is essential to maintain optimal engine performance and longevity. The frequency of cleaning depends on the environment and driving conditions. For dusty or muddy conditions, clean the filter more frequently. Check your snorkel’s manual for the specific cleaning instructions; generally, this involves removing the filter, gently tapping out loose debris, and washing it with a mild detergent and water.
Allow it to completely dry before reinstalling. Replacement is recommended if the filter is visibly damaged or significantly clogged. Never reuse a heavily soiled or damaged filter.
Scheduled Snorkel Inspections and Maintenance
Establishing a regular maintenance schedule is key to prolonging the life of your snorkel. We recommend a visual inspection every 3,000 miles or 3 months, whichever comes first. This should include checking all clamps, seals, and the filter for any signs of wear, damage, or debris. A more thorough inspection, including a leak test, should be performed every 6,000 miles or 6 months.
This schedule is a suggestion; adjust it based on your driving conditions and the manufacturer’s recommendations. For example, if you frequently drive off-road in extremely dusty conditions, more frequent inspections and filter cleaning will be necessary. Think of it like regular oil changes – preventative maintenance saves you money and potential problems in the long run.
Visual Aids and Explanations

Understanding the location of your Tacoma’s factory air intake and the snorkel’s components is crucial for a successful installation. Visual aids significantly improve the comprehension of this process, minimizing potential errors and ensuring optimal performance. This section provides detailed descriptions and illustrative diagrams to guide you.
Tacoma Factory Air Intake System Location
The stock air intake system on a Toyota Tacoma is typically located in the engine bay, drawing air from relatively low down near the front bumper. It’s usually a fairly straightforward system consisting of a large air filter housing, a connecting tube, and the intake manifold. The exact placement can vary slightly depending on the year and model of your Tacoma, but it will generally be found near the front of the engine compartment, often close to the fender well.
This low-lying location is susceptible to water ingestion during fording, highlighting the need for a snorkel. The air filter housing itself is usually secured with a few clips or screws, allowing for relatively easy access during the snorkel installation. The intake tube runs from the filter housing to the throttle body.
Snorkel Components and Functions
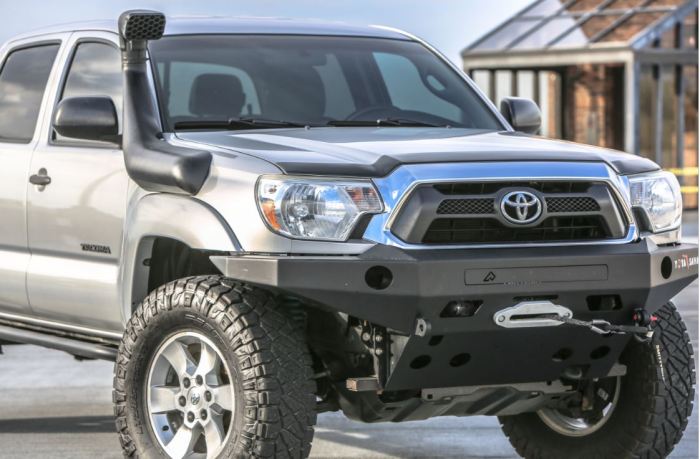
A typical snorkel system includes several key components. First, there’s the intake tube itself – a long, durable pipe that extends from the air filter housing up and out to a high point on the vehicle. This tube is designed to be weatherproof and to withstand harsh conditions. Then, there’s the ram air intake head, which is the part that protrudes above the vehicle’s roof or hood.
It’s designed to scoop in clean, dry air, even in challenging conditions. Next is the air filter, often a high-flow design to maximize airflow and filter efficiency. This is typically a larger filter than the stock unit to compensate for the increased air volume the snorkel handles. Finally, you’ll have various mounting brackets, seals, and clamps to secure all the components in place.
The snorkel’s function is to relocate the air intake to a much higher position, protecting the engine from water and dust ingestion, thus improving engine longevity and performance.
Proper Air Filter Placement and Sealing
Correct air filter placement and sealing are critical for the snorkel’s effectiveness. An improperly seated filter can lead to reduced airflow, engine performance issues, and even dust entering the engine. The filter must be firmly placed within its designated housing within the snorkel system. All connections between the filter housing, the intake tube, and the vehicle’s intake manifold need to be tightly sealed to prevent unfiltered air from entering the engine.
Leaks will drastically reduce the snorkel’s effectiveness and may allow water or dust to enter the engine. Using high-quality sealant and properly tightening all clamps are essential steps. A visual inspection after installation, confirming the absence of any gaps or leaks, is highly recommended.
Key Installation Steps
This diagram illustrates the removal of the factory air intake system, showing the location of the air filter housing, the connecting tube, and the intake manifold. Key features to highlight include the securing clips or screws and the routing of the factory air intake tube.
This image depicts the mounting of the snorkel’s ram air intake head, illustrating the proper positioning and the use of mounting brackets and sealant to ensure a secure and waterproof seal. The diagram should highlight the correct placement for optimal airflow and minimal obstruction.
This diagram details the connection of the snorkel’s intake tube to the vehicle’s intake system, emphasizing the secure connection between the snorkel’s intake tube and the factory air intake system. It also highlights the correct placement of the new air filter and the importance of proper sealing at all connection points.
Final Wrap-Up
Installing a snorkel on your Toyota Tacoma is a rewarding upgrade that significantly enhances its off-road performance. While it might seem daunting initially, following the steps Artikeld in this guide, you’ll successfully install your snorkel and enjoy the peace of mind knowing you can tackle deeper water crossings and dusty trails. Remember to always prioritize safety and double-check your work to ensure a secure and leak-free installation.
Now get out there and explore!