How to install a backup camera DIY? It’s easier than you think! This guide walks you through choosing the right system, gathering the necessary tools, and installing everything yourself, saving you a bundle at the mechanic. We’ll cover everything from wiring diagrams to troubleshooting tips, so you can confidently upgrade your ride with a rearview camera.
Forget pricey professional installations. This DIY project empowers you to improve your car’s safety and convenience with a little elbow grease and this handy guide. We’ll tackle choosing the perfect camera, running the wires, and mounting the monitor, all while keeping it simple and straightforward. Let’s get started!
Choosing the Right Backup Camera System

Picking the right backup camera can feel overwhelming, but with a little knowledge, you can find the perfect fit for your needs and skill level. This section will walk you through the key considerations to make when selecting a system, from camera type to crucial specifications.
Backup Camera System Types
Choosing between a wired, wireless, or integrated backup camera system is the first major decision. Each option presents a unique set of advantages and disadvantages. Consider your vehicle’s existing setup and your comfort level with DIY car modifications.
| Type | Features | Pros | Cons |
|---|---|---|---|
| Wired | Direct connection to the vehicle’s power and video input; typically offers higher quality video and more reliable signal. | Reliable signal, generally better image quality, often more affordable. | More complex installation, requires running wires through the vehicle. |
| Wireless | Transmits video signal wirelessly; easier installation, less wiring. | Easy installation, no need to run wires through the vehicle. | Potential for signal interference, potentially lower image quality, may require a stronger power source. |
| Integrated | Often factory-installed, integrated into the vehicle’s infotainment system; seamless integration, typically high-quality. | Cleanest look, often integrated with other features (parking sensors, etc.), high-quality video. | Most expensive option, requires professional installation in most cases, limited customization. |
Camera Specifications
Several specifications directly impact the camera’s performance and usefulness. Paying close attention to these details ensures you get a camera that meets your expectations.Resolution, viewing angle, night vision, and water resistance are critical factors. Higher resolution (measured in pixels, e.g., 720p, 1080p) means clearer images. A wider viewing angle (typically expressed in degrees) provides a broader view of the area behind your vehicle.
Night vision capabilities are essential for safe backing up in low-light conditions. Finally, a water-resistant rating (often expressed as an IP rating, e.g., IP67) protects the camera from the elements. For example, a camera with 1080p resolution, a 170-degree viewing angle, infrared night vision, and an IP67 rating would be a high-quality option for most applications.
Camera Sensor Types: CCD vs. CMOS
The image sensor is the heart of your backup camera. Two primary types exist: CCD (Charged Coupled Device) and CMOS (Complementary Metal-Oxide-Semiconductor). CCD sensors generally produce better image quality, especially in low light, but they consume more power and are more expensive. CMOS sensors are more energy-efficient and cost-effective, but they might exhibit more noise in low-light conditions.
The choice depends on your priorities; for most DIY installations, a CMOS sensor offers a good balance of performance and affordability. However, if low-light performance is paramount, a CCD sensor might be worth the extra investment.
Gathering Necessary Tools and Materials
Installing a backup camera yourself can save you some serious dough, but it’s crucial to have the right tools and materials on hand before you start. Failing to do so can lead to frustration, delays, and potentially even damage to your vehicle. Proper preparation is key to a smooth and successful installation.This section Artikels the essential tools and materials you’ll need, along with a visual guide to help you understand component placement and a step-by-step process for checking your vehicle’s electrical system.
So you’re thinking about tackling a DIY backup camera install? That’s awesome, but remember, driving safety is key, and comprehensive coverage can be a lifesaver. Check out the Costco Connect Auto Insurance benefits to see if they offer the protection you need. Then, once you’re insured, you can confidently proceed with your backup camera installation project, adding that extra layer of security to your ride.
Tools and Materials List
Before you begin, gather these essential items. Having everything ready will make the installation process much more efficient and less stressful. Don’t forget to check your camera’s specific instructions for any additional requirements.
- Backup camera system (including camera, monitor, and wiring harness)
- Drill with various drill bits (for mounting the camera and running wires)
- Wire strippers/cutters
- Multimeter
- Electrical tape
- Screwdrivers (Phillips and flathead)
- Pliers (needle-nose and regular)
- Fish tape or similar wire-feeding tool
- Zip ties or cable clamps
- Soldering iron and solder (optional, but recommended for a more robust connection)
- Heat shrink tubing (optional, but recommended for added protection)
- Protective eyewear and gloves
Vehicle Component Placement
Imagine the rear of your vehicle. The following is a general representation; exact placement will vary depending on your specific vehicle model.“` License Plate Area | | | Camera | |_______| / \ / \ / \ / \ / \ / \ / \ / \ / \ / \ / \ / \ /____________________________________\ Rear Bumper/Tailgate (Wiring runs along here) | | | Monitor| (usually in the dash) |_______|“`The camera will typically be mounted in or near the license plate area.
The wiring harness will run from the camera, along the vehicle’s interior, to the monitor, which is usually located on the dashboard.
Vehicle Electrical System Compatibility Check
It’s critical to verify your vehicle’s electrical system is compatible with your backup camera before proceeding with the installation. Incorrect voltage or polarity can damage both the camera and your vehicle’s electrical system.
- Identify the power source: Locate a suitable power source, usually a reverse light circuit. This circuit is only energized when the vehicle is in reverse.
- Use a multimeter: Set your multimeter to DC voltage. Connect the positive lead to the wire you intend to use, and the negative lead to a good ground point (bare metal on the vehicle’s chassis). Put the vehicle in reverse. The voltage should read around 12V. If not, you’ve found the wrong wire or there’s an issue with the circuit.
- Check polarity: Ensure you understand the polarity (+ and -) of your backup camera’s wiring harness. Incorrect polarity will prevent the camera from working, and in some cases, cause damage. Your camera’s instructions will provide this information.
- Test the ground: Verify a good ground connection is available. A clean, bare metal surface is ideal. Poor grounding can lead to inconsistent performance or malfunctions.
Running the Wiring and Connecting the Camera: How To Install A Backup Camera DIY
Okay, so you’ve got your awesome backup camera and all the right tools. Now comes the slightly trickier part: getting the wires from the back of your car to the front, and then hooking everything up. This involves some careful routing and a bit of electrical know-how, but don’t worry, we’ll walk you through it. The key is patience and a methodical approach.Routing the wires can be a bit of a puzzle.
You want to keep the wires hidden and protected from damage, so you’ll likely be tucking them along existing wiring harnesses or running them through trim pieces. The exact route will depend on your car’s make and model, but generally, you’ll be working your way from the rear bumper (where the camera is mounted) towards the dashboard. Expect some tight spaces and possibly some fiddly bits of plastic trim to remove and replace.
If you encounter particularly stubborn clips, a plastic trim removal tool can be your best friend. Remember to take pictures as you go, so you know how to put everything back together!
Routing the Wiring, How to install a backup camera DIY
Running the wiring involves carefully feeding the camera’s cable from the rear of the vehicle to the front. This often necessitates removing interior trim panels to access the space behind them, allowing for a clean, concealed wire run. Common pathways include the side sills, under the carpeting, or along existing wiring harnesses. Be mindful of sharp edges and avoid pinching or kinking the wire.
Use zip ties or cable clamps to secure the wiring every few inches to prevent it from sagging or becoming dislodged. A helpful tip is to use a flexible wire snake or fish tape to guide the cable through tight spaces, preventing damage to the wire and your car’s interior. For longer runs, consider using a longer wire than you initially anticipate, to allow for extra slack and ease of maneuverability.
Connecting the Camera’s Power and Video Output
Now for the electrical connection. This is where understanding your vehicle’s wiring diagram becomes crucial. The camera typically requires a power source (usually 12V) and a connection to your video display (usually a monitor or your car’s infotainment system). The camera’s wiring harness will usually have color-coded wires for power (+ and -), video output, and possibly a ground.
You’ll need to connect these wires to the corresponding wires in your vehicle’s electrical system. Incorrect connections can damage your car’s electrical system or the camera itself, so double-check your work!
So you’re tackling a DIY backup camera install? That’s awesome! Improving your classic car’s safety is key, especially if you need to get it appraised for insurance purposes – check out these Classic car insurance appraisal services to ensure you’re covered. Once you’ve got that sorted, remember to carefully route the wiring for your new camera to avoid any damage to your car’s interior.
Common Wiring Configurations
The specific wiring configuration will vary depending on your vehicle and the backup camera system. However, here’s a general idea of what you might encounter:
| Vehicle Type | Power (+12V) | Ground (-) | Video Output |
|---|---|---|---|
| Sedan | Reverse light wire (often white or yellow) | Chassis ground | RCA connector to aftermarket screen or factory input |
| SUV | Reverse light wire (often white or yellow) | Chassis ground | RCA connector to aftermarket screen or factory input |
| Truck | Reverse light wire (often white or yellow) | Chassis ground | RCA connector to aftermarket screen or factory input |
| Minivan | Reverse light wire (often white or yellow) | Chassis ground | RCA connector to aftermarket screen or factory input |
Always consult your vehicle’s wiring diagram and the backup camera’s instructions before making any connections. If you’re unsure about anything, it’s best to seek professional help.
Installing the Monitor and Mounting the Camera
Okay, so you’ve run the wires – congrats! Now comes the fun part: actually installing the camera and monitor. This section will walk you through the process, covering different mounting options and providing tips for optimal placement. Remember, a properly installed system is key to maximizing safety and visibility.
Installing the backup camera and monitor involves several steps, from choosing the best mounting location to securing the monitor in your vehicle. Proper placement and secure installation will guarantee a reliable and safe reversing experience.
Backup Camera Mounting Options
There are several ways to mount your backup camera, each with its own pros and cons. The best choice depends on your vehicle and personal preferences. Consider factors like ease of installation, aesthetics, and potential interference with other vehicle components.
Let’s explore the most common options:
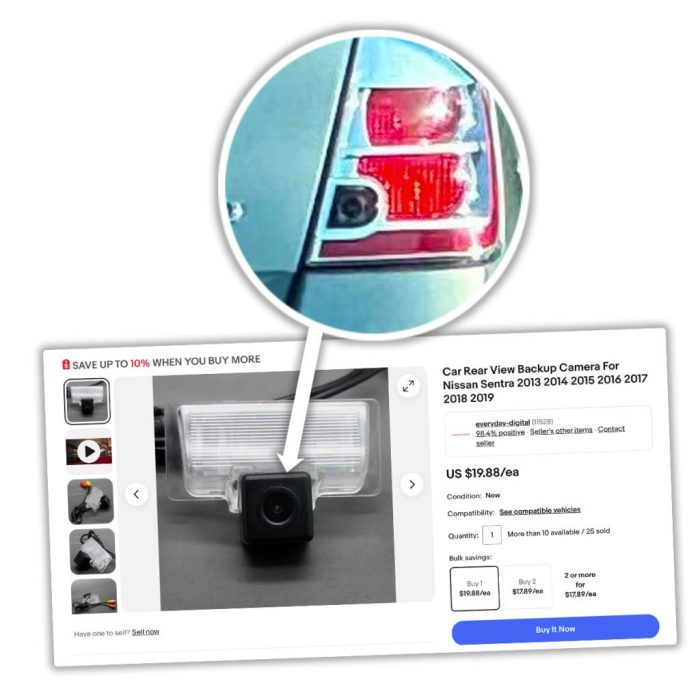
- License Plate Mount: This is the most common and often easiest method. The camera simply replaces or mounts alongside your existing license plate. It’s a straightforward installation, but visibility might be slightly obstructed depending on the license plate’s size and position. This is ideal for vehicles where access to the tailgate or bumper is limited.
- Integrated into the Tailgate: For some vehicles, particularly trucks and SUVs, integrating the camera into the tailgate offers a cleaner, more factory-like look. This often requires drilling holes and may be more complex, potentially requiring specialized tools. However, the result is a very discreet and professional installation.
- Bumper Mount: Mounting the camera directly to the bumper offers a good balance between ease of installation and a relatively unobstructed view. This is usually done by drilling a small hole and securing the camera with bolts or screws. However, the camera’s location may be lower to the ground, potentially resulting in a view that is more affected by ground clearance and mud.
In-Car Monitor Installation
Installing the monitor usually involves finding a suitable location on your dashboard or elsewhere within easy viewing distance. Consider factors like visibility while driving, access to power, and the monitor’s size.
The steps typically include:
- Choosing a location: Select a spot that doesn’t obstruct your view of the road but provides a clear view of the monitor’s screen. Consider using a location where the monitor won’t be distracting while driving.
- Securing the monitor: Use the included mounting hardware to securely attach the monitor to your chosen location. This might involve adhesive mounts, suction cups, or screws. Ensure it is firmly attached to prevent movement or vibration.
- Connecting the power: Connect the monitor to a power source. This might involve tapping into your vehicle’s existing power system (often requiring a fuse tap), or using a 12V power adapter plugged into the cigarette lighter. Always follow the manufacturer’s instructions for safe and proper wiring.
Optimizing Camera Position and Angle
The camera’s position and angle are critical for optimal visibility. A poorly positioned camera can lead to blind spots or distorted images.
Here are some tips for achieving the best view:
- Height: Aim for a camera height that provides a clear view of the area directly behind your vehicle, avoiding excessive upward or downward angles.
- Angle: Adjust the camera angle to minimize distortion and maximize the field of view. A slightly downward angle is generally preferred to see the ground directly behind the vehicle.
- Testing: After mounting, test the camera’s view and adjust its position as needed. Consider backing up in different situations to ensure optimal visibility in various conditions.
Testing and Troubleshooting
After you’ve wrestled with the wiring and secured the camera and monitor, the moment of truth arrives: testing your handiwork. This crucial step ensures everything functions as expected and helps identify any issues before you hit the road. A little preventative troubleshooting can save you a lot of headaches later.Proper testing involves a methodical approach, checking each component individually before assessing the system’s overall performance.
Don’t just assume it works; verify it. This section will walk you through the process and offer solutions to common problems.
System Functionality Test
Begin by connecting the power to the backup camera system. Turn on your vehicle’s ignition (but don’t start the engine). The monitor should power on and display the camera’s feed. If it doesn’t, check the power connections at both the monitor and the camera. Make sure the fuse is intact.
Next, shift your vehicle into reverse. The camera’s image should appear on the monitor immediately. Observe the image quality – is it clear, bright, and free of distortion? If the image is distorted, blurry, or intermittently cuts out, check the camera’s connection and the wiring for any loose or damaged cables. If the image is dark, check the camera’s exposure settings and ensure there’s adequate lighting.
A test in various lighting conditions (daylight, shade, nighttime) will provide a comprehensive evaluation.
Common Problems and Solutions
Troubleshooting a non-functional backup camera system usually boils down to a few common culprits. Knowing what to look for will speed up the diagnosis.
- Problem: Monitor doesn’t power on. Solution: Check the power source, fuse, and wiring connections at both the monitor and the camera. Ensure the monitor’s power switch is turned on.
- Problem: No image displayed on the monitor. Solution: Verify the camera’s connection to the monitor. Check for loose or damaged cables. Inspect the camera lens for obstructions. Confirm the camera is receiving power.
- Problem: Poor image quality (blurry, distorted, or grainy). Solution: Adjust the camera’s focus and exposure settings if possible. Check for obstructions on the camera lens. Inspect the wiring for any damage or interference. A faulty camera may need to be replaced.
- Problem: Intermittent image or complete loss of signal. Solution: Check for loose connections. Inspect the wiring for any shorts or breaks. Look for potential interference from other electrical components in the vehicle. A bad connection may require re-soldering.
- Problem: Camera image is upside down or mirrored. Solution: Some cameras have image adjustment settings; consult your camera’s manual. If the camera lacks these settings, you may need to adjust wiring to reverse the video signal. This often involves switching specific wires.
Troubleshooting Flowchart
A visual guide can help streamline the diagnostic process. The following flowchart provides a step-by-step approach to troubleshooting your backup camera system:
- Check Monitor Power: Is the monitor receiving power? Yes -> Proceed to Step 2. No -> Check fuse, power source, and wiring connections.
- Check Camera Power: Is the camera receiving power? Yes -> Proceed to Step 3. No -> Check fuse, power source, and wiring connections.
- Check Connections: Are all connections secure? Yes -> Proceed to Step 4. No -> Tighten all connections and check for damaged cables.
- Check Video Signal: Is there a video signal? Yes -> System operational. No -> Inspect the camera lens for obstructions. Check for damaged or loose cables. Consider replacing the camera or monitor if necessary.
Safety Precautions and Legal Considerations
Installing a backup camera yourself can save you money, but safety should always be your top priority. Improper installation can lead to electrical hazards, damage to your vehicle, and even accidents. Understanding relevant laws and taking precautions is crucial for a successful and safe project.This section Artikels important safety measures and legal considerations to keep in mind throughout the installation process and during the use of your new backup camera system.
Failing to adhere to these guidelines could result in injury, vehicle damage, or legal repercussions.
Electrical Safety
Working with car electronics involves electricity, which can be dangerous. Always disconnect the vehicle’s negative battery terminal before beginning any wiring work. This prevents accidental short circuits that could damage your car’s electrical system or even cause a fire. Use insulated tools and be mindful of where you place your hands to avoid accidental contact with exposed wires.
If you’re uncomfortable working with electricity, it’s best to seek professional help. Remember, safety is paramount.
Vehicle Damage Prevention
Avoid drilling into any critical vehicle components, such as fuel lines or brake lines. Consult your vehicle’s repair manual to identify areas where drilling is safe. Use appropriate-sized drill bits to prevent stripping screw holes or cracking the vehicle’s body panels. Take extra care when running wires, ensuring they are properly secured and routed to avoid interference with moving parts or creating potential pinch points.
Local Laws and Regulations
Regulations regarding backup camera installations vary by location. Some jurisdictions might require professional installation, especially for commercial vehicles. Others may have specific requirements for camera placement, visibility, and functionality. Before starting the installation, check your local Department of Motor Vehicles (DMV) or equivalent agency’s website or contact them directly to ensure compliance with all applicable laws. Failure to comply could result in fines or even legal action.
Safe Operation of the Backup Camera System
Properly functioning backup camera systems are essential for safe reversing. Regularly check the camera’s image quality and monitor functionality. Ensure the monitor is easily visible to the driver without obstructing their view of the road. Remember that the backup camera is a supplementary safety feature and should not be relied upon exclusively when reversing. Always maintain awareness of your surroundings and use your mirrors and other safety measures as well.
Keep the camera lens clean to maintain clear visibility. If the camera or monitor malfunctions, address the issue promptly to ensure continued safe operation.
Outcome Summary
Installing a backup camera yourself is a rewarding experience, boosting both your car’s safety and your DIY skills. By following this guide, you’ve learned to select the right components, navigate the wiring process, and troubleshoot potential issues. Now go forth and conquer those blind spots – your wallet and peace of mind will thank you!