How to clean a throttle body? It sounds kinda intimidating, right? But trust me, it’s way easier than you think, and it can seriously boost your car’s performance. A dirty throttle body can lead to sluggish acceleration, poor gas mileage, and even a check engine light. This guide will walk you through the whole process, from gathering your supplies to putting everything back together, so you can get back to cruising in no time.
We’ll cover everything from identifying the signs of a dirty throttle body to safely disconnecting your battery and using the right cleaning solutions. We’ll also troubleshoot common problems and show you how to prevent future issues. Think of this as your ultimate guide to a cleaner, more efficient engine – and a happier you.
Introduction to Throttle Body Cleaning
Okay, so you’re tackling a throttle body cleaning – awesome! This isn’t rocket science, but it’s a pretty important job for keeping your car running smoothly. A clean throttle body ensures your engine gets the right amount of air, leading to better performance and fuel efficiency. Think of it as a crucial air valve controlling the engine’s breathing.
A dirty one? Well, that’s like trying to breathe through a clogged straw.The throttle body is basically the gateway for air entering the engine. It’s a butterfly valve controlled by your gas pedal. When you press the gas, the valve opens, letting more air in. More air means more fuel, and more power.
A dirty throttle body can cause this valve to stick or not open properly, leading to all sorts of problems.
Signs of a Dirty Throttle Body
Several symptoms point to a dirty throttle body. You might experience rough idling, stalling, poor acceleration, or even a check engine light. These issues occur because the dirty throttle body prevents the smooth flow of air into the engine, disrupting the carefully calibrated air-fuel mixture. In extreme cases, a severely clogged throttle body can even prevent the engine from starting.
Think of it like trying to drink from a straw clogged with mud; the flow is severely restricted.
Necessary Tools and Materials
Before you start, gather your tools. Having everything ready makes the job much easier and prevents frustrating interruptions. This list provides a comprehensive overview of the essentials.
| Tool Name | Description | Purpose | Where to Find |
|---|---|---|---|
| Throttle Body Cleaner | A specialized spray cleaner designed for throttle bodies. It’s usually a type of carb cleaner, but specifically formulated to be gentle on the delicate throttle plate. | Dissolves built-up deposits and grime. | Auto parts stores, online retailers |
| Shop Rags or Paper Towels | Clean, lint-free cloths are essential. | Cleaning the throttle body and surrounding areas. | Auto parts stores, hardware stores |
| Screwdrivers (Phillips and Flathead) | You’ll likely need these to remove the throttle body’s retaining screws or clamps. | Disassembling and reassembling the throttle body. | Your toolbox, hardware store |
| Protective Gloves | Essential for protecting your hands from chemicals and grime. | Protecting your hands from chemicals and grime. | Hardware stores, auto parts stores |
Preparing for Throttle Body Cleaning
Alright, so you’re ready to tackle that dirty throttle body. Before you dive in, remember this isn’t your average weekend car wash – safety first! Proper preparation is key to avoiding any mishaps and ensuring a smooth cleaning process. We’ll cover the necessary safety precautions, disconnecting the battery, and locating that elusive throttle body.Disconnecting the Battery’s Negative TerminalBefore you even think about touching anything near the throttle body, you need to disconnect your car battery’s negative terminal.
This is crucial for preventing accidental shorts that could damage your car’s electronic systems. Seriously, don’t skip this step. A simple spark can fry expensive components. To disconnect the terminal, locate the battery (usually under the hood), identify the negative terminal (marked with a “-” symbol or often black), and carefully loosen the clamp using a wrench.
Pull the cable off the terminal and set it aside, away from any metal parts. This breaks the electrical circuit, ensuring your safety.Throttle Body Location and AccessFinding the throttle body might seem like a treasure hunt, but it’s usually in a pretty predictable spot. Generally, it’s located on the intake manifold, between the air filter housing and the engine.
It’s a fairly sizable component, usually a rectangular or cylindrical housing with a butterfly valve inside. The exact location and accessibility can vary greatly depending on the make, model, and year of your vehicle. Some vehicles have easy access, with the throttle body readily visible once the air intake is removed. Others might require removing various components to get a clear view.
Think of it like this: some cars are like opening a toolbox, while others are more like taking apart a complex clock. Consult your vehicle’s repair manual for precise location and removal instructions. The manual will also detail any specific tools or procedures needed for your specific car.
Cleaning the Throttle Body
Cleaning your throttle body can significantly improve your car’s performance, especially if you’re experiencing rough idling or poor acceleration. A dirty throttle body restricts airflow, leading to these issues. The process is relatively straightforward, but requires care to avoid damaging delicate parts. Let’s explore the different methods available.
Throttle Body Cleaning Methods
Several methods exist for cleaning a throttle body, each with its own advantages and disadvantages. Choosing the right method depends on the level of dirt and your comfort level with automotive maintenance. Improper cleaning can damage the delicate throttle plate and sensor, so proceed cautiously.
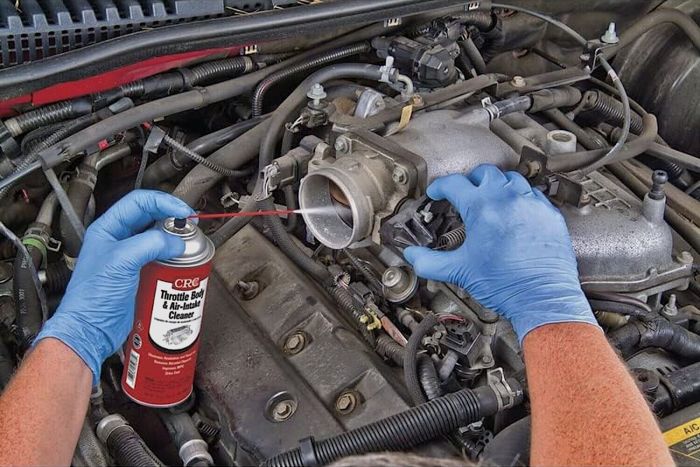
- Throttle Body Cleaner Spray: This is the most common and often easiest method. Specific throttle body cleaners are formulated to dissolve grime and leave behind no residue that could affect the sensor.
- Disconnect the battery’s negative terminal.
- Remove the air intake hose and any other components obstructing access to the throttle body.
- Carefully spray the cleaner onto the throttle body, focusing on the butterfly valve and the surrounding areas. Allow the cleaner to sit for a few minutes to break down the grime.
- Use a clean rag or shop towels to wipe away the loosened debris. Avoid excessive rubbing that could scratch the surface.
- Reconnect the air intake hose and other removed components.
- Reconnect the battery’s negative terminal.
- Start the engine and let it idle for a few minutes to allow the system to adjust.
- Carburetor Cleaner: While not specifically designed for throttle bodies, carburetor cleaner can be used in a pinch. However, it’s crucial to use it sparingly and follow the same safety precautions as with throttle body cleaner. Some formulations might leave behind residue, potentially harming the sensitive sensor.
- Disconnect the battery’s negative terminal.
- Remove the air intake hose and any other components obstructing access to the throttle body.
- Lightly spray the carburetor cleaner onto the throttle body, avoiding over-saturation. Focus on the butterfly valve and the surrounding areas.
- Use a clean rag or shop towels to wipe away the loosened debris. Avoid excessive rubbing.
- Reconnect the air intake hose and other removed components.
- Reconnect the battery’s negative terminal.
- Start the engine and let it idle for a few minutes to allow the system to adjust.
- Compressed Air: Compressed air can be useful for removing loose debris, but it’s generally not sufficient for tackling heavy grime. It’s best used in conjunction with a cleaning solution.
- Disconnect the battery’s negative terminal.
- Remove the air intake hose and any other components obstructing access to the throttle body.
- Use bursts of compressed air to blow away loose dirt and debris from the throttle body.
- Follow up with a cleaning solution (throttle body cleaner or carburetor cleaner) if necessary.
- Reconnect the air intake hose and other removed components.
- Reconnect the battery’s negative terminal.
- Start the engine and let it idle for a few minutes to allow the system to adjust.
Comparison of Cleaning Methods and Potential Drawbacks
Throttle body cleaner spray is generally preferred for its effectiveness and formulation specifically designed for this application. Carburetor cleaner can work, but carries a higher risk of leaving residue. Compressed air alone is insufficient for thorough cleaning. The biggest drawback across all methods is the potential for damage to the sensitive throttle position sensor (TPS) if not handled carefully.
Using excessive force or harsh chemicals can easily damage this component, leading to costly repairs.
Importance of Correct Cleaning Solution and Avoiding Damage
Using the correct cleaning solution is paramount. Throttle body cleaner is formulated to be compatible with the materials used in the throttle body and won’t harm the TPS. Generic cleaners or harsh solvents could damage the plastic or rubber components, or leave behind a residue that interferes with the sensor’s operation. Always disconnect the negative battery terminal before starting any cleaning to prevent accidental short circuits.
Gentle cleaning motions and avoiding excessive force are crucial to prevent scratching or damaging the delicate throttle plate and sensor. Remember, patience and precision are key to a successful and safe throttle body cleaning.
Post-Cleaning Procedures: How To Clean A Throttle Body

After you’ve meticulously cleaned your throttle body, the reassembly process is crucial to ensure your vehicle runs smoothly and avoids any potential issues. This involves carefully reconnecting components, addressing any error codes that might have popped up, and, of course, making sure your battery is securely reconnected. Ignoring these steps could lead to problems ranging from a rough idle to a check engine light that refuses to go away.Proper reassembly and error code clearing are essential for a successful throttle body cleaning.
Failing to do so could result in a malfunctioning system, potentially leading to further damage or costly repairs. Let’s walk through the necessary steps to ensure a smooth and successful post-cleaning process.
Reconnecting the Battery’s Negative Terminal
Before you even think about starting your car, make absolutely sure the negative terminal is securely reconnected to the battery. This is a simple but critical step. Remember, disconnecting the negative terminal was a safety precaution to prevent electrical shorts during the cleaning process. Loose connections can cause all sorts of electrical gremlins, so take your time and ensure a snug fit.
First, locate the negative terminal (usually marked with a “-” symbol). Then, carefully align the terminal clamp with the battery post and firmly tighten the clamp bolt. A properly connected terminal will have a secure, solid connection without any play or looseness. A visual inspection should confirm that the connection is tight and free of corrosion.
Reassembling Removed Parts
Once the negative terminal is secured, it’s time to put everything back together. This involves reinstalling any parts you removed during the throttle body cleaning process. Remember to replace everything in the reverse order of removal. This ensures that each component is seated correctly and that there are no loose parts that could interfere with the throttle body’s operation.
For instance, if you removed an air intake hose, make sure it’s properly seated and clamped before moving on. Double-check all connections to ensure a tight seal to prevent air leaks. A loose connection can negatively affect engine performance and fuel efficiency. Pay close attention to any gaskets or seals to ensure they’re properly placed to maintain a leak-free system.
Clearing Error Codes
After reassembly, you might find that a check engine light has illuminated. This is common after a throttle body cleaning, as the cleaning process can sometimes trigger diagnostic trouble codes (DTCs). These codes are stored in the car’s computer memory and indicate a potential problem. While the light might disappear on its own after a few driving cycles, it’s a good idea to clear the codes using an OBD-II scanner.
An OBD-II scanner, readily available at most auto parts stores, plugs into your car’s diagnostic port (usually located under the dashboard). Once connected, the scanner can read and clear any stored error codes. After clearing the codes, start the car and let it run for a few minutes to allow the computer to relearn the throttle body’s position.
If the check engine light remains illuminated after this, it suggests a more serious underlying issue that requires further diagnosis.
Troubleshooting Common Issues
Cleaning your throttle body can be a straightforward process, but like any DIY auto repair, things can go wrong. Understanding potential problems and their solutions can save you time, frustration, and potentially costly repairs. This section will Artikel common issues encountered during throttle body cleaning and provide practical solutions and preventative measures.
Throttle Position Sensor (TPS) Damage
Improper handling or the use of harsh cleaning agents can damage the delicate throttle position sensor (TPS). The TPS is a crucial component that monitors the throttle plate’s position and sends this information to the engine’s computer. Damage to the TPS can lead to poor engine performance, rough idling, or even a check engine light.
| Problem | Possible Cause | Solution | Prevention |
|---|---|---|---|
| TPS Malfunction After Cleaning | Cleaning solution or debris contacting the TPS sensor element; excessive force during cleaning. | If the TPS is visibly damaged, replacement is necessary. If not, carefully clean any residue from the TPS with a very soft brush and electronics cleaner, ensuring it is completely dry before reassembly. A malfunctioning TPS may also require recalibration, which usually involves using a scan tool. | Protect the TPS during cleaning. Use a targeted approach, avoiding spraying cleaning solution directly onto the sensor. Use a soft brush and only approved cleaning solutions. |
| Intermittent Engine Stalling or Rough Idling | Loose or improperly connected TPS wiring after reassembly. | Carefully check all wiring connections to the TPS. Ensure they are securely plugged in. If the problem persists, consult a mechanic. | Double-check all connections before and after reassembly. Use visual inspection and a gentle tug test on each connector. |
Improper Reassembly
Incorrect reassembly of the throttle body can lead to a variety of problems, from poor idle to a complete engine failure. The throttle plate must be properly seated and the throttle body correctly bolted back onto the intake manifold.
| Problem | Possible Cause | Solution | Prevention |
|---|---|---|---|
| Vacuum Leaks | Improper sealing of the throttle body gasket after reassembly. | Inspect the gasket for damage and replace if necessary. Ensure the throttle body is properly seated and all bolts are tightened to the manufacturer’s specifications. | Carefully inspect the gasket before reassembly and replace if damaged or worn. Use a torque wrench to tighten bolts to the correct specification. |
| Poor Idle or Engine Stalling | Throttle plate not properly seated or incorrectly adjusted after cleaning. | Carefully inspect the throttle plate to ensure it moves freely and smoothly. Refer to your vehicle’s service manual for proper throttle plate adjustment. | Avoid forceful cleaning that could misalign the throttle plate. Use a soft brush to clean around the plate and ensure proper seating after cleaning. |
Cleaning Solution Residue
Leaving cleaning solution residue on the throttle body can cause problems down the line. The residue can attract dirt and grime, eventually leading to poor throttle response and performance issues.
| Problem | Possible Cause | Solution | Prevention |
|---|---|---|---|
| Poor Throttle Response | Residue from cleaning solution restricting throttle plate movement. | Thoroughly rinse the throttle body with clean, dry compressed air after cleaning. Ensure all traces of cleaning solution are removed. | Use the correct cleaning solution in the correct dilution. Avoid over-application of the solution. Thoroughly rinse and dry the throttle body after cleaning. |
Maintenance and Prevention
Keeping your throttle body clean isn’t just a one-time fix; it’s about establishing a preventative maintenance routine to ensure your engine runs smoothly and efficiently for years to come. Regular cleaning and overall vehicle maintenance significantly impacts the longevity and performance of your throttle body, preventing costly repairs down the line. Neglecting these practices can lead to decreased fuel economy, rough idling, and even engine damage.A well-maintained throttle body contributes to optimal engine performance, leading to better fuel efficiency and a more responsive driving experience.
This proactive approach saves you money on repairs and keeps your vehicle running its best. Think of it like regularly changing the oil – it’s an investment in the health of your entire engine system.
Cleaning your throttle body can improve your car’s performance, but a dead battery can totally derail that project. If you’re struggling to get your car started, you might need to check out this guide on How to fix a parasitic battery drain first – a drained battery could be why your cleaning efforts aren’t making a difference.
Once you’ve got that sorted, you can get back to tackling that gunky throttle body.
Throttle Body Maintenance Schedule
Regular vehicle maintenance is crucial for preventing throttle body issues. A good preventative maintenance schedule should include visual inspections and cleaning at specific intervals, depending on your driving conditions and vehicle type. For example, city driving with frequent stop-and-go traffic often leads to faster accumulation of dirt and grime compared to highway driving.
- Every 15,000 – 20,000 miles (or annually): A visual inspection of the throttle body. This involves checking for visible dirt, grime, or carbon buildup. If significant buildup is present, cleaning is recommended.
- Every 30,000 – 40,000 miles (or every two years): Thorough cleaning of the throttle body. This more frequent cleaning is especially important for vehicles frequently driven in dusty or dirty environments.
- As needed: If you notice symptoms like rough idling, poor acceleration, or a check engine light, a cleaning should be performed sooner than scheduled.
The Importance of Regular Vehicle Maintenance
Regular maintenance extends far beyond just the throttle body. It encompasses a variety of services designed to keep your entire vehicle in optimal condition. These services, such as oil changes, air filter replacements, and fuel system cleaning, directly impact the cleanliness of your throttle body. For instance, a clogged air filter can force more contaminants into the intake system, leading to faster throttle body fouling.
Cleaning your throttle body can seriously improve your car’s performance, but remember to disconnect the battery first! Once you’re in there, making sure you’ve got the right coolant is key – check out this article on the Best coolant for Honda Accord 2025 to avoid any engine issues while you’re working on it. After you’re done with the coolant, carefully clean the throttle body with throttle body cleaner and a brush, then reassemble everything.
Similarly, a dirty fuel system can introduce deposits that accumulate on the throttle plate.A comprehensive maintenance plan helps to minimize the introduction of contaminants into the intake system, reducing the frequency of throttle body cleaning. This translates to less time spent on repairs and maintenance, more time on the road, and ultimately, a longer lifespan for your vehicle.
Tips for Extending Throttle Body Lifespan, How to clean a throttle body
Several practices can help extend the life of your throttle body. These strategies focus on preventing the buildup of contaminants and ensuring the proper functioning of related engine components.
- Use high-quality fuel: Lower-quality fuel can contain more impurities that can contribute to throttle body fouling.
- Regularly replace your air filter: A clean air filter prevents contaminants from entering the intake system and reaching the throttle body.
- Maintain a clean engine bay: A clean engine bay reduces the amount of dust and debris that can settle on the throttle body.
- Avoid driving in extremely dusty or dirty conditions: If possible, limit exposure to harsh environments that can accelerate throttle body contamination.
Visual Aids
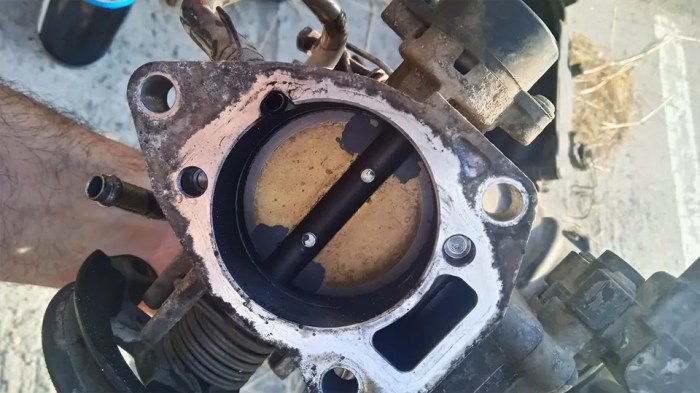
A picture is worth a thousand words, especially when it comes to something as visually distinct as a dirty versus clean throttle body. Understanding the visual differences is crucial for effective cleaning and recognizing potential problems. The following descriptions will help you visualize the process and identify areas needing attention.A dirty throttle body presents a stark contrast to its clean counterpart.
The butterfly valve, the main moving part, is often the most affected.
Dirty Throttle Body Appearance
Imagine a throttle body coated in a thick, sticky, dark brown or black residue. This buildup isn’t just dirt; it’s a mixture of oil, fuel deposits, carbon, and other combustion byproducts. The texture varies depending on the severity of the buildup; it can be gummy and soft in some areas, while other sections might have hardened, almost crust-like deposits.
These deposits often accumulate more heavily around the edges of the butterfly valve and the throttle body bore, restricting airflow. You might even notice a distinct sheen or glossiness to the oily residue in certain areas, especially where the fuel has pooled. The color isn’t uniform; it can range from a light brown near cleaner areas to a deep, almost black, tar-like substance in the most clogged regions.
The butterfly valve itself may stick or move sluggishly due to this buildup, impacting engine performance.
Clean Throttle Body Appearance
In stark contrast, a clean throttle body gleams. The metallic surfaces are bright and shiny, free from any discoloration or buildup. The butterfly valve moves freely and smoothly. There is no sticky residue or oily sheen. The overall appearance is one of polished metal, reflecting light evenly across all surfaces.
The color is consistent, typically a uniform metallic silver or gray depending on the material. The bore of the throttle body is clear and unobstructed, allowing for optimal airflow. The difference between a clean and dirty throttle body is dramatic, with the clean version exhibiting a noticeable lack of the dark, sticky deposits characteristic of a neglected unit.
The contrast is easily seen, emphasizing the importance of regular maintenance.
Final Wrap-Up
So, there you have it! Cleaning your throttle body might seem like a daunting task, but with the right tools, a little patience, and this guide, you’ll be amazed at how easy it is. Remember, a clean throttle body means better performance, improved gas mileage, and a smoother ride. Regular maintenance is key, so don’t hesitate to tackle this project and keep your ride running smoothly.
Now get out there and conquer that throttle body!